Prepare to Activate on ChargePoint
Before leaving the installation site, you must prepare the newly installed station(s) for activation as described in this section.
Requirements
-
The CPF25's MAC
 Message Authentication Code address and activation password, shown at right (this information is printed on an activation label that is affixed to the CPF25's main unit, and a spare label is included in the shipping box with each main unit)
 -
The exact location (to the parking space) where the CPF25 is physically installed
-
A smart phone with Internet access
-
Installer account information (user name and password) on ChargePoint (provided upon completion of training)
Overview of Steps
Pinpoint the Station(s)
-
Using your smart phone, navigate to m.chargepoint.com.
-
Log into the ChargePoint mobile site from your smart phone with your installer credentials.
-
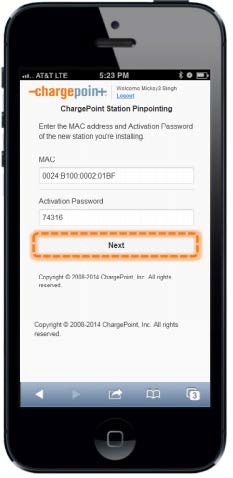
Enter the MAC
Message Authentication Code address and activation password printed on the CPF25's activation label, and touch Next. -
Confirm that you are installing a new CPF25 charging station.
-
When prompted, touch OK to share your GPS location data with the ChargePoint mobile site.
-
When prompted, touch OK to review the station’s location on Google™ Maps.
-
Review the station address and zoom in to review the initial position of the station’s pin on the map.
-
Using your finger, move the pin to the correct parking spot location.
-
If needed, manually adjust the address of the station’s location.
-
Take a picture of the station using your smart phone. Scroll down to Upload a Station Picture and choose the station picture.
-
Add helpful information for drivers.
-
Touch SUBMIT to pinpont the station on the ChargePoint map.
Document the Radio Group
A radio group consists of a ChargePoint Gateway and up to nine CPF25 charging stations that communicate with it over Wi-Fi![]() Wireless Fidelity. For each radio group, attach the spare activation labels below to document how the stations are organized. After completing this step and the following checklist, provide this information to the person responsible for activating the Gateway and the CPF25 charging stations. Use one page for each radio group (this page is included in all Installation Guides).
Wireless Fidelity. For each radio group, attach the spare activation labels below to document how the stations are organized. After completing this step and the following checklist, provide this information to the person responsible for activating the Gateway and the CPF25 charging stations. Use one page for each radio group (this page is included in all Installation Guides).

Complete the Post-Installation Checklist
Before leaving the installation site, complete this checklist for the CPF25. Then provide this information, along with the information on the previous page, to the person responsible for activating the CPF25.
Customer:
Name:____________________
Site Address:____________________
Contact:____________________
Installer:
Company:____________________
Address:____________________
Phone:____________________
Installer:____________________
Contact:____________________
-
Earth/ground connection is made to the ground lugs (where applicable).
-
Service wiring has been fully inserted into the terminal blocks and all electrical connections are clean and snug.
-
Electrical enclosures are clean and free of wire strands and metal shavings.
-
All covers are installed and all fasteners are tightened.
-
The LED located at the bottom of the ChargePoint Gateway is solid green (this can take up to 20 minutes).
-
The parking area is clean and free of all packaging and debris.
-
All pinpointing steps on the previous page have been completed.
-
A white light is displaying around the CPF25’s connector dock.
-
The Wi-Fi
Wireless Fidelity LED, located on the left side of the main unit’s cover, is solid green (this can take up to 10 minutes). -
SHARED CIRCUITS ONLY: Specify panel and breaker numbers and apply spare activation labels below:
Panel ID #:____________________
Breaker #:____________________
