Prepare for Installation
This section describes how to prepare for the installation.
Check Site Readiness
To check site readiness, complete this checklist before you install Power Link 2000.
|
Power Link 2000 Site Readiness Checklist |
|||||
|---|---|---|---|---|---|
|
The electrical equipment is installed and labeled in accordance with the applicable national electrical code — such as NFPA70, the Canadian Electrical Code (CSA No 22.1), IEC 60364, or BS7671, depending on the installation region — and all applicable requirements of the serving electric utility company and the authority having jurisdiction. |
☐ | |||
|
The upstream power cabinets are installed at locations proposed in the site drawings. |
☐ | |||
|
The concrete pad or concrete surface meets the mounting specifications given in the Express Distro Power Link 2000 Site Design Guide and/or is inspected and approved by a structural engineer for the dimensions and weights (as given in the Express Distro Power Link 2000 Site Design Guide) of the Power Link 2000 and its related components such as charging cable(s) and Cable Management Kit (CMK |
☐ | |||
|
Wires and conduits meet the requirements given in the site drawings. |
☐ | |||
|
The installation site meets the drainage, ventilation guidelines, and clearances given in the Express Distro Power Link 2000 Site Design Guide. |
☐ | |||
|
The slope at the installation site does not exceed 20 mm per meter (0.25 in per ft). If necessary, use a grinder or a hammer and chisel to remove any concrete that is not level with the rest of the concrete pad or surface. |
☐ | |||
|
Sufficient space is available to use a forklift or other lifting equipment, unpack, remove packing materials, and allow two people to freely move throughout the site. |
☐ | |||
|
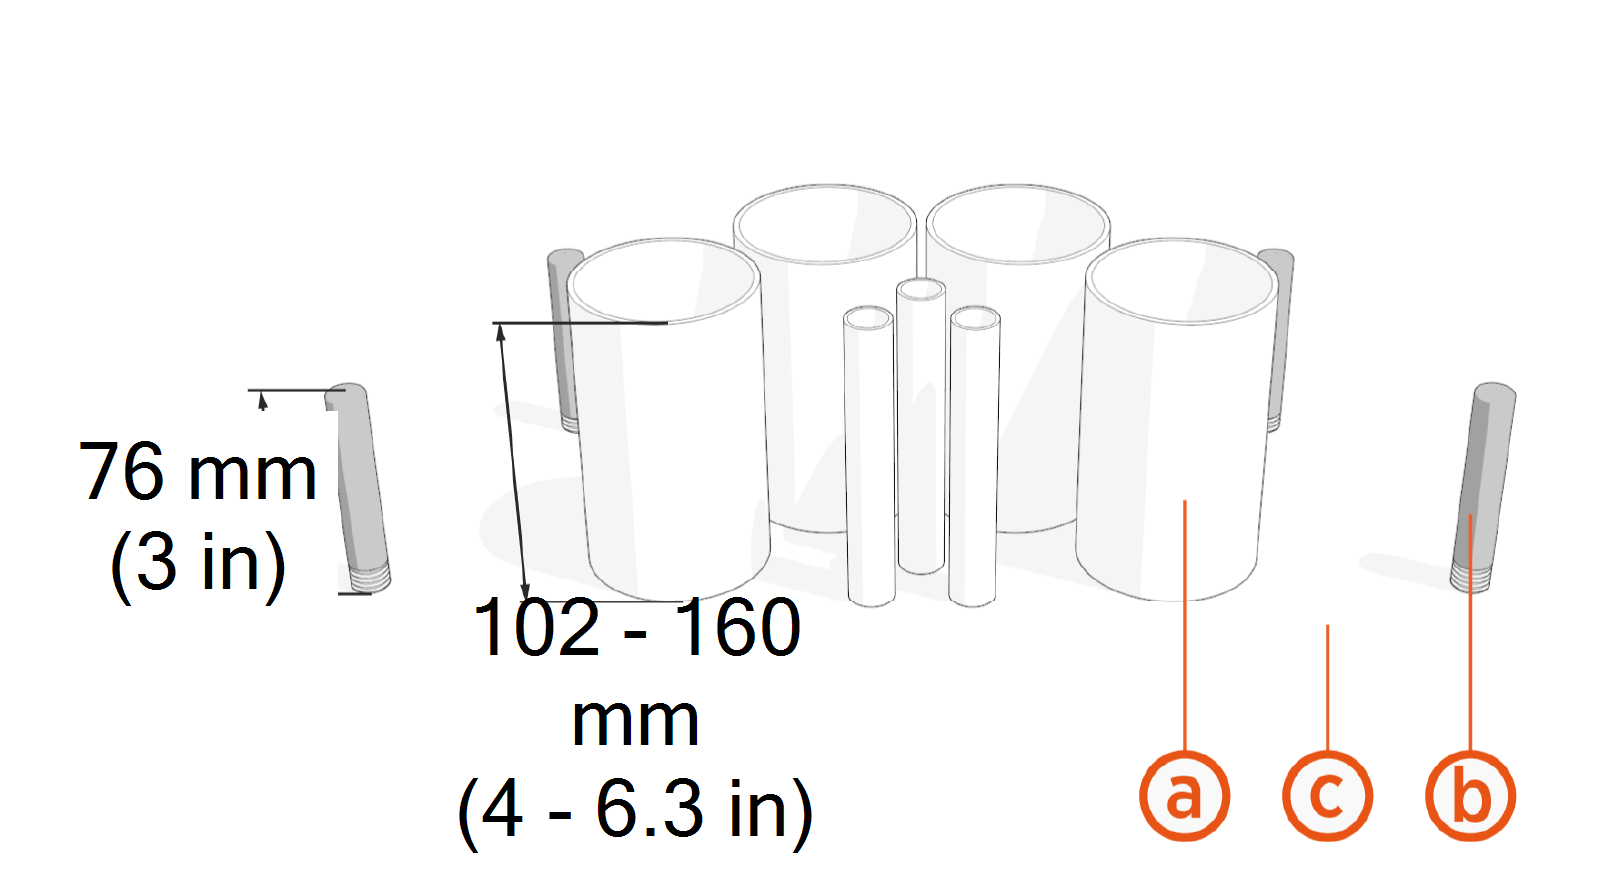
The anchor bolts, conduits, and concrete pad meet the requirements listed below:
|
☐ | |||
|
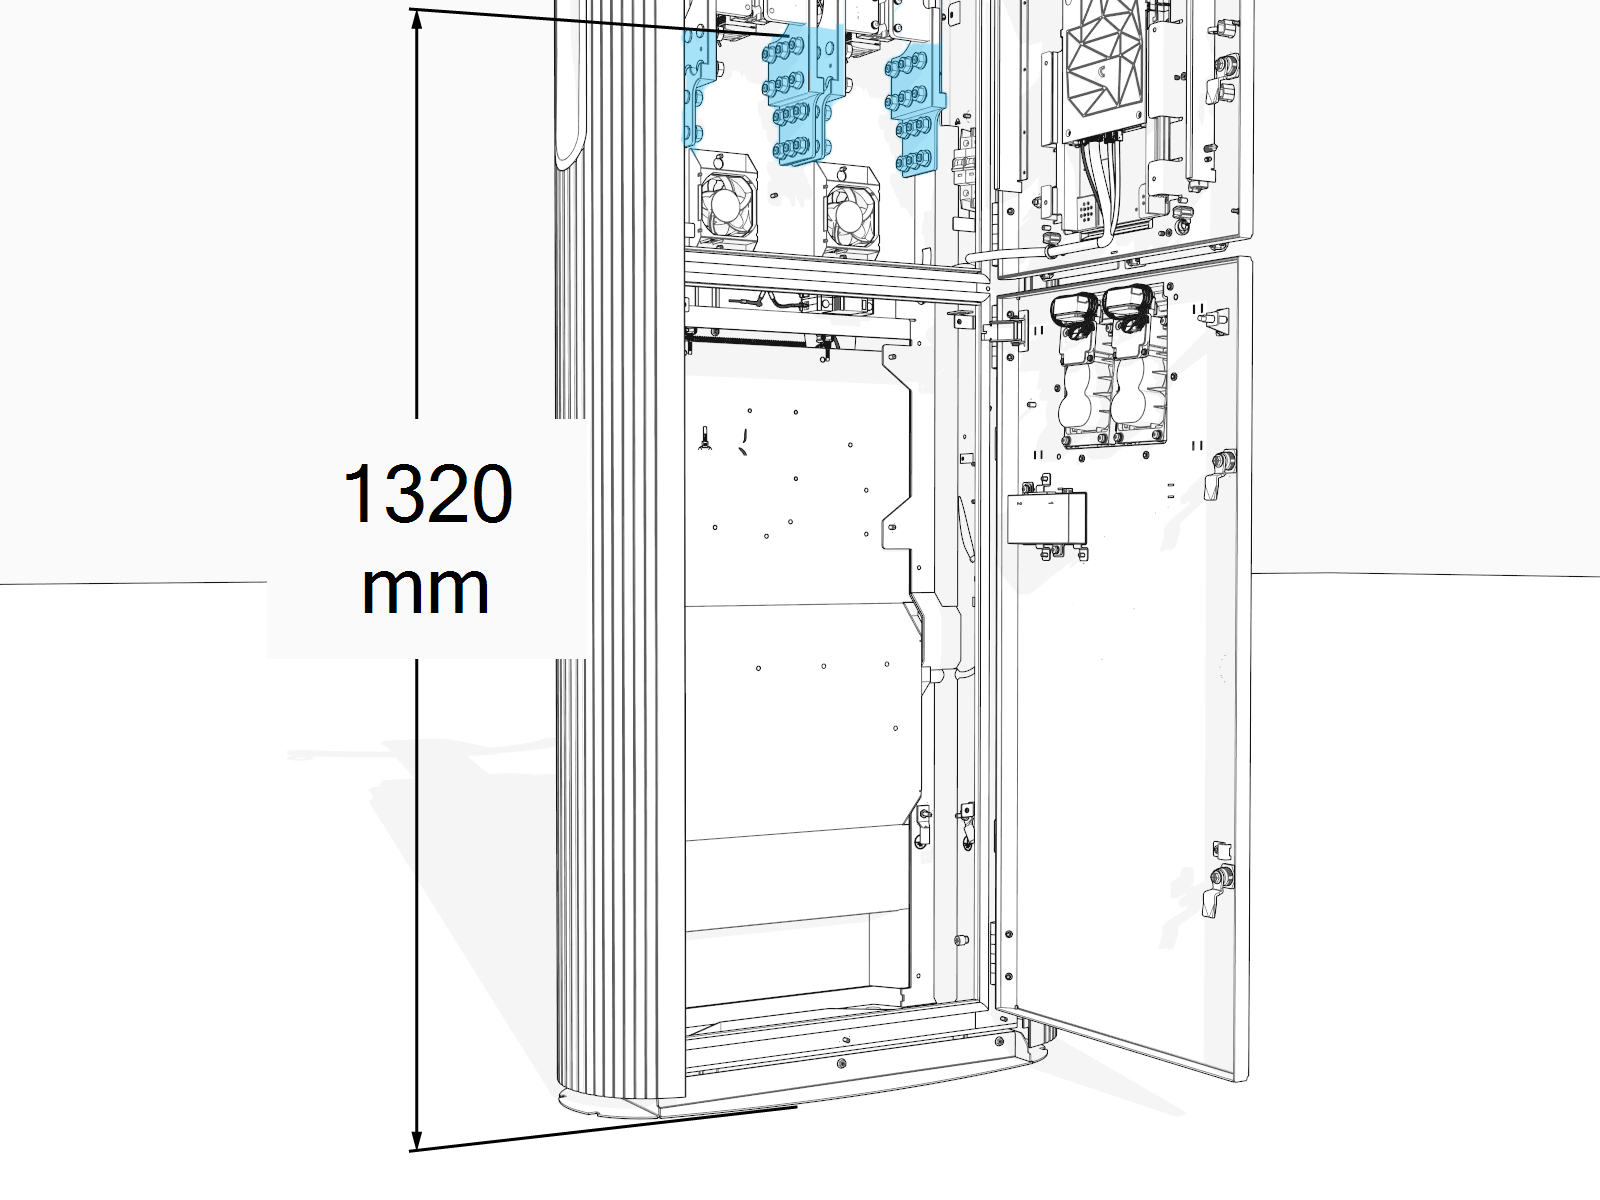
In regions that use conduits, wires can be pulled before or after mounting the Power Link 2000. If you want to pull wires before mounting or if the site is using armored cables directly buried and exposed from underground, make sure that the wires reach the bus bars at the following height.
|
☐ | |||
Check Electrical Readiness
For electrical input and output specifications, refer to the Express Distro Power Link 2000 Datasheet and Express Distro Power Link 2000 Site Design Guide at ChargePoint Product Reference Documentation .
Understand Wire Landing Locations
Depending on configuration, the pedestal-mount Power Link 2000 has one or two DC power paths, named A and B. Each power path has two wire landings, an upper landing and a lower landing. Power Link 2000s with a single charging cable are configured with Power Path B landings only.
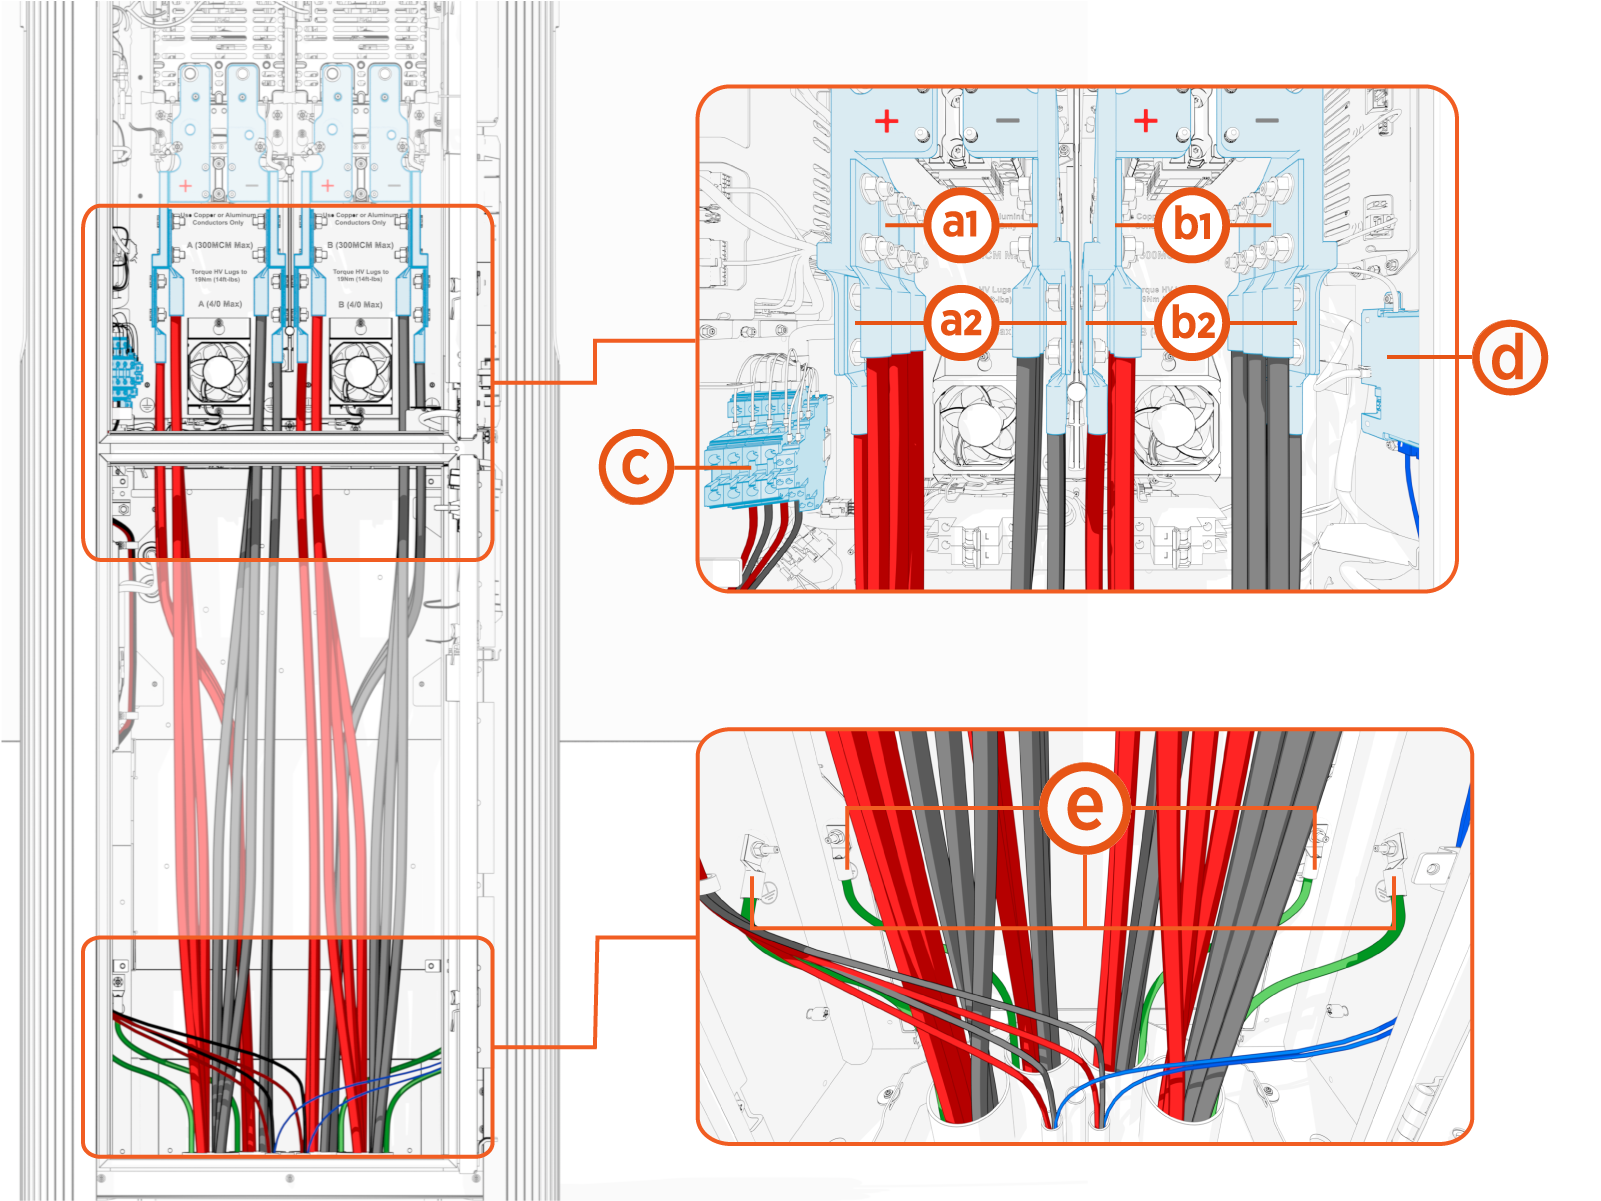
(a1) DC Power Path A, upper landing
(a2) DC Power Path A, lower landing
(b1) DC Power Path B, upper landing
(b2) DC Power Path B, lower landing
(c) 48 V DC and soft shutdown
(d) Ethernet
(e) Ground
In this guide, “ground” refers to Protective Earth (PE).
Required Tools and Materials
Installing the Power Link 2000 requires at least two people. Additionally, the installer must bring the following tools and materials. These are not provided by ChargePoint.
Comply with these guidelines to prevent component damage.
-
Use tools suitable to torque metric fasteners. All fasteners used on the Power Link 2000 are in metric sizes.
-
Use the given torque values to tighten the fasteners.
-
Ensure that the tools such as torque tool, multimeter, and Ethernet tester are calibrated.
|
|
Forklift with anti-slip forks
|
|
Stepladder |
|
|
Industrial vacuum cleaner |
|
Paper towel roll |
|
|
Wire brush (to remove any residue on anchor bolts) |
|
Duct seal compound |
|
|
Hard hat |
|
Cut-resistant gloves |
|
|
Safety glasses |
|
Cable ties |
|
|
Cable puller or fish tape |
|
Measuring tape or other tool to measure linear dimensions |
|
|
Level |
|
Lockout/Tagout equipment |
|
|
Multimeter (meter and probes rated for 1000 V) |
|
Ethernet tester such as a Klein Tools VDV526-052 VDV LAN |
|
|
Conduit cutter (refer to site plans for conduit sizes) |
|
Box cutter |
|
|
Wire cutters |
|
Wire strippers |
|
|
Lug crimping tool and die |
|
Ethernet (RJ45) connector crimping tool |
|
|
Torque wrench |
|
Torque screwdriver |
|
|
Shallow socket set (7 mm, 10 mm, 17 mm) and 24 mm deep socket |
|
Hex wrench set |
|
|
Torx screwdriver (T20, T30) |
|
T25 Security screwdriver |
|
|
Flathead screwdriver set, including 2.5 mm and 3.5 mm tip for terminal blocks |
|
Phillips head screwdriver set |
|
|
Torque paint pen |
|
Permanent marker |
|
|
Anti-oxidant joint compound (to make gastight joint between wire and lug) and wire pulling lubricant |
|
Dielectric grease |
|
|
Smartphone with:
|
|
|
|
|
|
|
|






































Wires and Terminations
Gather all wires and wire terminations required for the installation project. Refer to the Express Distro Power Link 2000 Site Design Guide for general system wire specifications and refer to the site plan for wires and terminations required specifically for the installation project.
Tightening Torque
|
Component (xFastener Quantity) |
Component Material |
Fastener |
Tool |
Torque |
|---|---|---|---|---|
|
Charging cable bus bar safety cover (x1 or x2) |
Plastic |
M4 |
T20 Torx |
1.7 Nm (15 in-lb) |
|
Top cap, front (x2) |
Plastic |
M4 |
T25 Security |
|
|
CMK tetherball (x5) |
Metal |
M4 |
T20 Torx |
2.8 Nm (25 in-lb) |
|
Standard holster (x4 or x8) |
Plastic |
M5 |
T25 Security |
|
|
Top cap, rear (x2) |
Plastic |
M5 |
T25 Security |
|
|
Charging cable assembly (x4 or x8) |
Metal |
M5 |
T25 Security |
4.5 Nm (40 in-lb) |
|
SCE mounting bracket (x4) |
Metal |
M5 |
8 mm socket |
|
|
Ethernet to USB (x2) |
Metal |
M5 |
8 mm socket |
|
|
Conduit opening sleeve or gland plate (x2) |
Metal |
M5 |
T25 Security |
|
|
Omni Port (x2) |
Metal |
M5 |
T25 Security |
|
|
Metal |
M5 |
T25 Security |
||
|
Side panels (x2 or x4) |
Metal |
M5 |
T25 Security |
|
|
Ground wire lug nut (up to x4) |
Metal |
M6 |
10 mm socket |
5.6 Nm (50 in-lb) |
|
Charging cable DC wire lug nuts (x8 or x16) |
Metal |
M6 |
10 mm socket |
|
|
Charging cable ground wire lug nut(x1 or x2) |
Metal |
M6 |
10 mm socket |
|
|
Metal |
M6 |
T25 Security |
||
|
CMK mast (x8) |
Metal |
M6 |
T30 Torx |
|
|
Overhead CMK screws (x4) |
Metal |
M6 |
T25 Security |
3.4 Nm (30 in-lb) |
|
Overhead CMK nuts (x4) |
Metal |
M8 |
13 mm socket |
12.2 Nm (108 in-lb) |
|
Metal |
M8 |
13 mm socket |
||
|
Tall CMK assembly (x4) |
Metal |
M10 |
6 mm hex |
13.5 Nm (120 in-lb) |
|
DC power path wire lug nuts (up to x48) |
Metal |
M10 |
17 mm socket |
19 Nm (14 ft-lb) |
|
Metal |
M16 |
24 mm deep socket |
54.2 Nm (40 ft-lb) |
|
|
Metal |
M16 |
24 mm deep socket |
94.9 Nm (70 ft-lb) |
|
|
48 V DC wire terminal block set screws (up to x8) |
|
|
3.5 mm flathead screwdriver |
1.5 Nm (13.3 in-lb) |
|
|
|
2.5 mm flathead screwdriver |
0.6 Nm (5.3 in-lb) |
Power Link 2000 Packages

The crate is heavy and can cause injury or death if dropped. Do not stand or walk beneath the crate while it is being lifted. Take precautions against the crate tipping or sliding.
Leave components in the shipping crate until needed. When removing, protect them from damage (such as scratches) by placing them flat on a blanket or tarp, face up. Do not stand up cover panels, as they may be knocked or blown over. Cover charging connectors to prevent damage or ingress.
Package Configurations, Dimensions, and Weights
Power Link 2000 with non-LCC
Power Link 2000 with non-LCC Liquid Cooled Cable ship with the charging station enclosure, charging cable, and cable management kit (CMK Cable Management Kit) each placed in separate packages. Also, the cosmetic top cap and covers ship together in a separate package.
|
Package |
Variant |
Dimensions (L x W x H) |
Max. Weight |
|---|---|---|---|
|
Power Link 2000 non-LCC configuration (enclosure only) |
- |
2.34 x 0.96 x 0.61 m (92.25 x 38.13 x 24.13 in) |
173 kg (380 lbs) |
|
(non-LCC |
Standard length (5.8 m or 19 ft) |
0.72 x 0.58 x 0.22 m (28.45 x 22.74 x 8.75 in) |
23 kg (50 lbs) |
|
Medium length(7.6 m or 25 ft) |
32 kg (70 lbs) |
||
|
Standard |
1.12 x 0.65 x 0.24 m (44.13 x 25.75 x 9.5 in) |
28 kg (60 lbs) |
|
|
Tall |
1.87 x 0.35 x 0.40 m (73.50 x 14.75 x 16.13 in) |
41 kg (90 lbs) |
|
|
Overhead CMK |
0.45 x 0.40 x 0.18 m (17.50 x 15.88 x 7 in) |
12 kg (25 lbs) |
|
|
(top cap and covers) |
- |
1.11 x 0.53 x 0.64 m (44 x 21 x 25 in) |
15 kg (33 lbs) |
Power Link 2000 with LCC
Power Link 2000 with LCC Liquid Cooled Cable ship with the charging station enclosure, charging cables, and standard CMK Cable Management Kit placed in a single package. The charging cables and CMK Cable Management Kit mast are preinstalled on the charging station enclosure. The cosmetic top cap and covers ship together in a separate package.
|
Package |
Variant |
Dimensions (L x W x H) |
Max. Weight |
|---|---|---|---|
|
Power Link 2000 LCC configuration (enclosure with dual LCCs and standard CMK |
- |
2.49 x 1.12 x 0.82 m (98 x 44 x 32.38 in) |
318 kg (700 lbs) |
|
(top cap and covers) |
- |
1.11 x 0.53 x 0.64 m (44 x 21 x 25 in) |
15 kg (33 lbs) |
Liquid Cooled Cable(s) and CMK Cable Management Kit mast ship preinstalled on the charging station enclosureAdditional Kits
|
Package |
Variant |
Dimensions (L x W x H) |
Max. Weight |
|---|---|---|---|
|
Ethernet to USB |
- |
0.3 x 0.39 x 0.22 m (11.81 x 15.35 x 8.66 in) |
1.36 kg (3 lb) |
|
Card Reader Kit |
- |
0.89 x 0.63 x 0.29 m (35.13 x 24.75 x 11.38 in) |
0.5 kg (1 lb) |
|
Sequential Charging Kit |
- |
0.27 x 0.18 x 0.05 m (10.6 x 7.0 x 1.8 in) |
2.3 kg (5 lb) |
Power Link 2000 Non-LCC Configuration Package
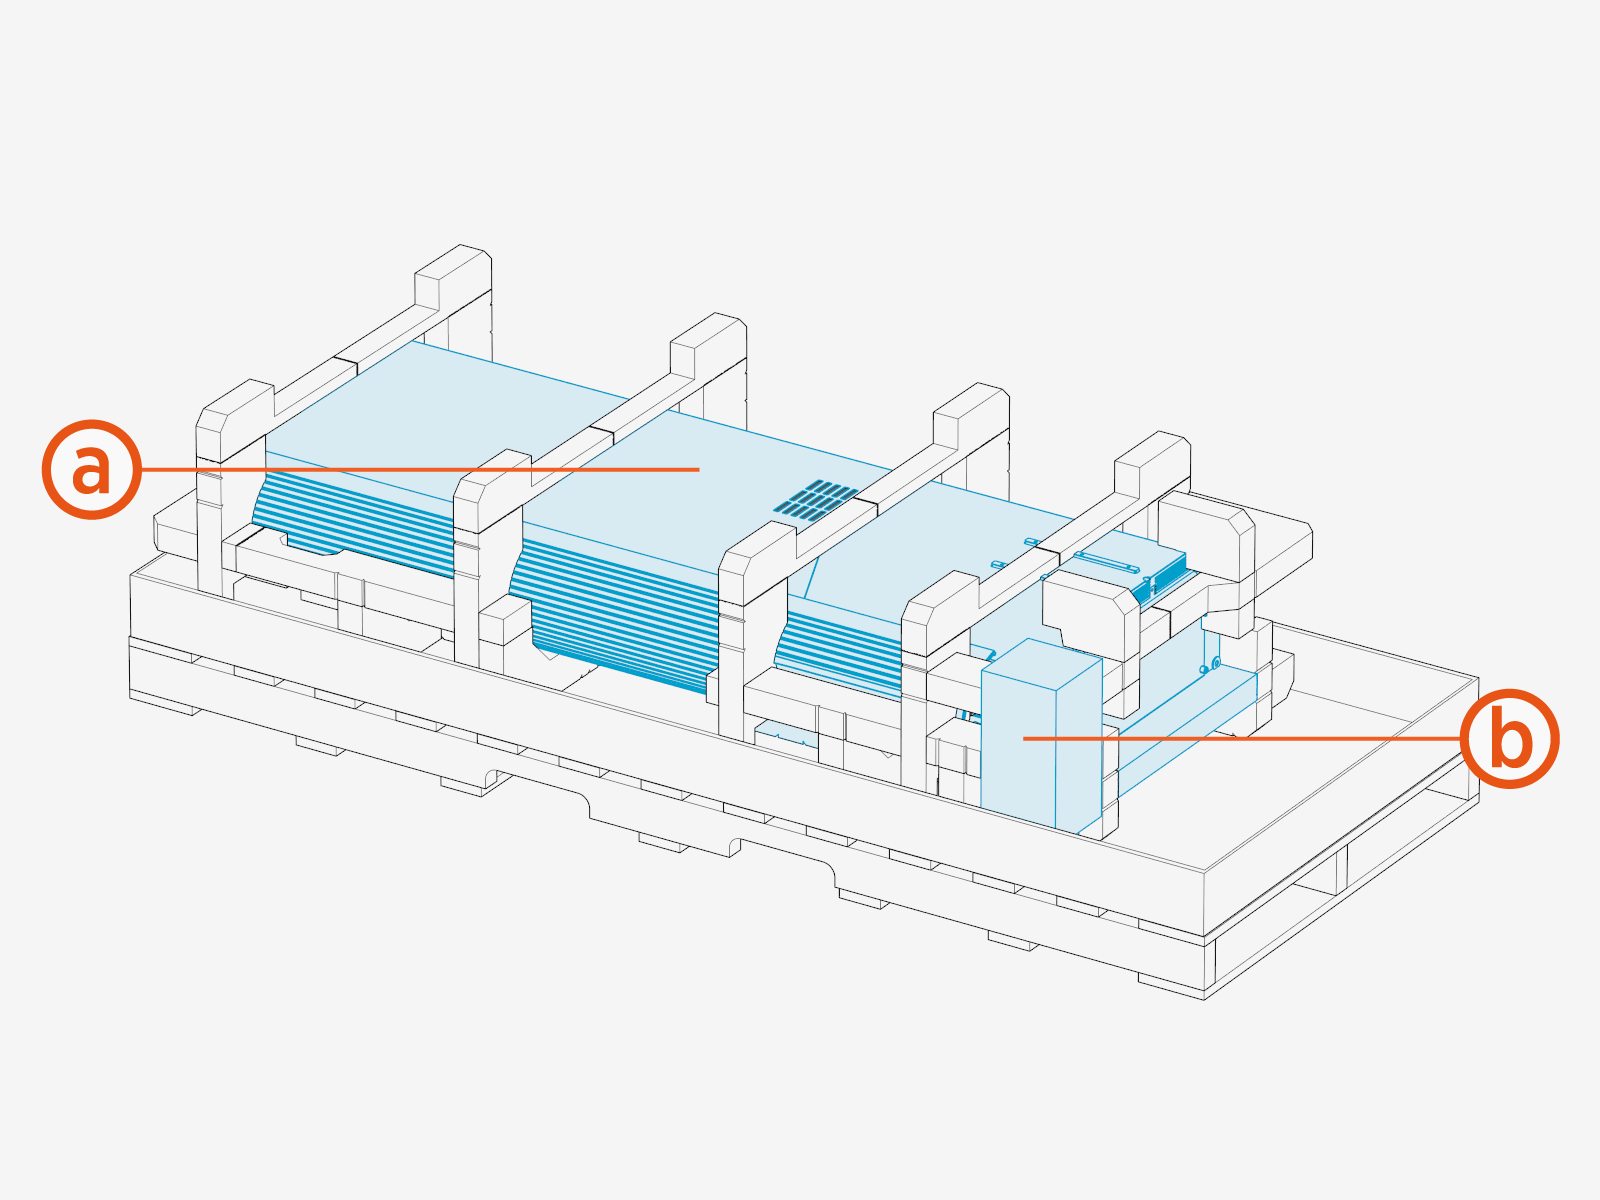
Check the package for the following components:
For any missing component, contact chargepoint.com/support.
-
Power Link 2000 assembly
-
Install kit, which contains the following components:
-
M16 hex nuts and washers for mounting Power Link 2000 (x12)
-
T25 Security screwdriver
-
Sealant for sealing the conduit opening (x5)
-
Safety Hub jumper wire (*)
-
(*) The Safety Hub jumper wire may ship inside the Power Link 2000 package or in a separate package that ships with the Power Link 2000 unit.
Power Link 2000 LCC Configuration Package
Check the package for the following components:
For any missing component, contact chargepoint.com/support
.
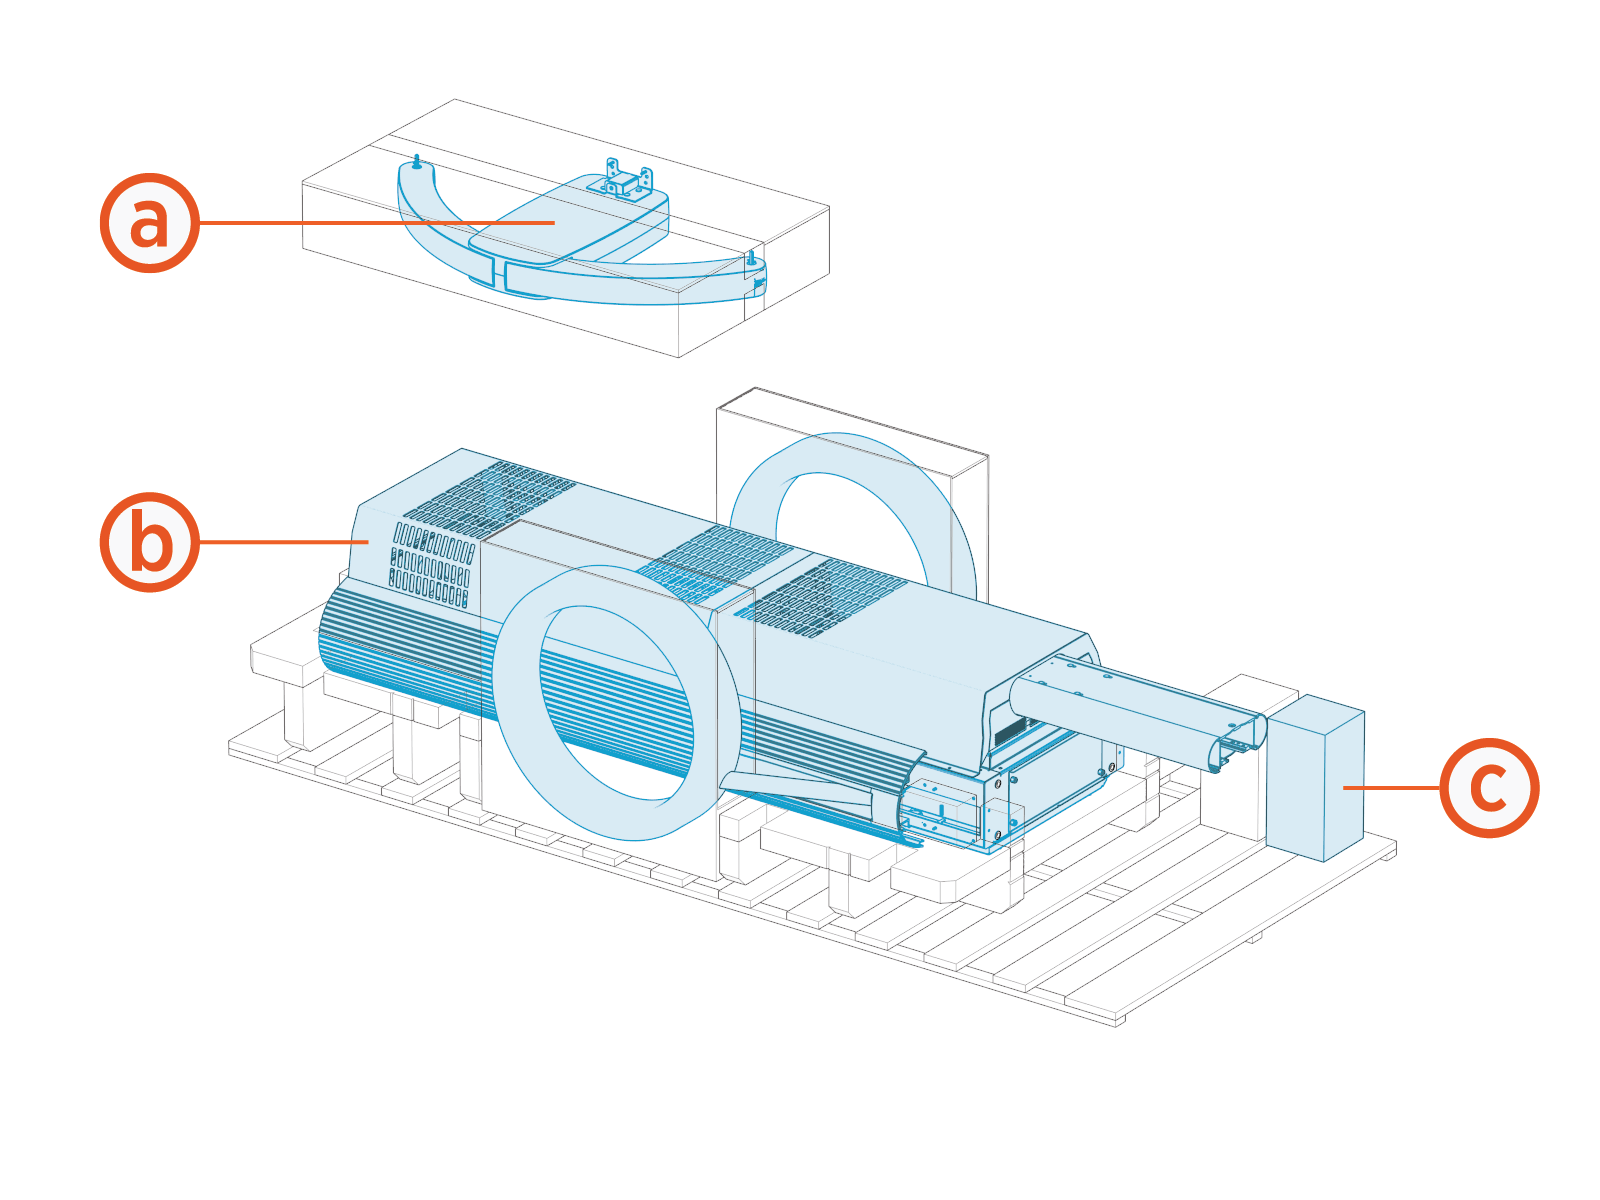
-
CMK
Cable Management Kit swingarm assembly with one or two swingarms -
Power Link 2000 assembly with pre-installed charging cables and CMK
Cable Management Kit mast -
Install kit, which contains the following components:
-
M16 hex nuts and washers for mounting Power Link 2000 (x12)
-
T25 Security screwdriver
-
Sealant for sealing the conduit opening (x5)
-
Safety Hub jumper wire (*)
(*) The Safety Hub jumper wire may ship inside the Power Link 2000 package or in a separate package that ships with the Power Link 2000 unit.
-
Cosmetic Kit Package
Check the cosmetic kit package for the following components:
For any missing component, contact chargepoint.com/support.
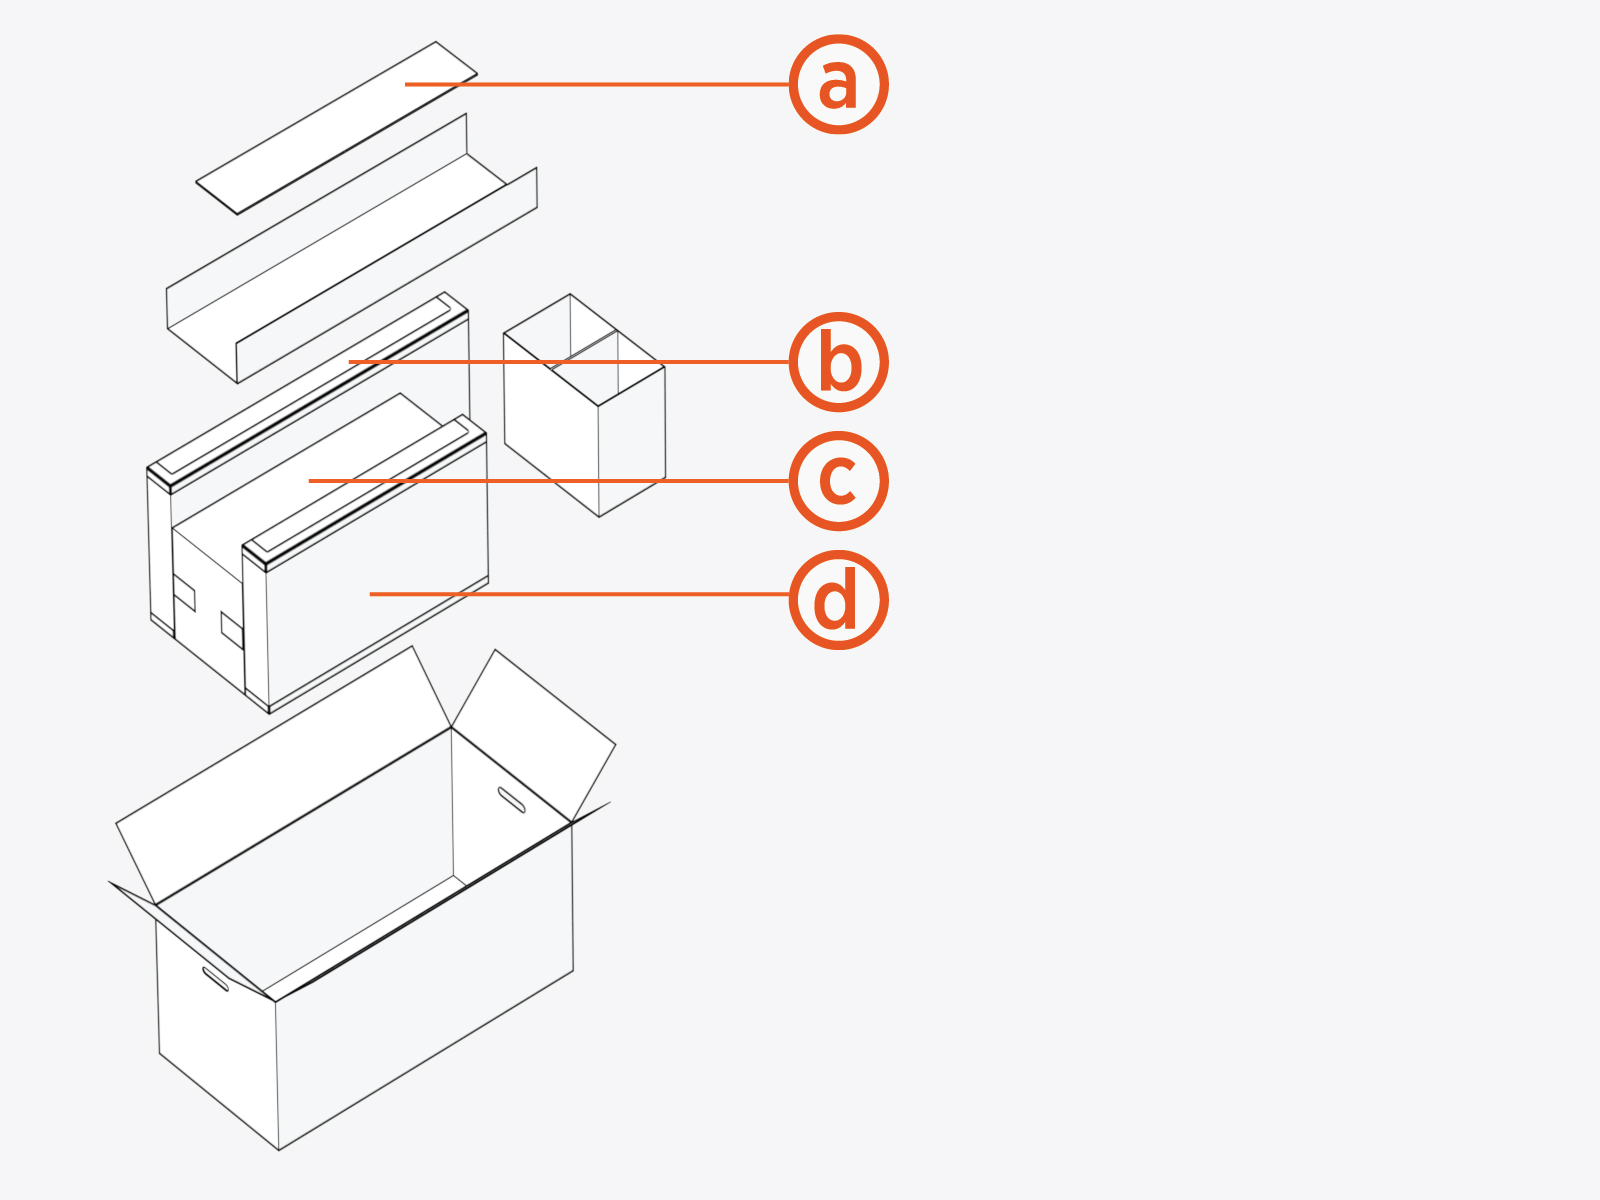
(a) CMK Cable Management Kit mast covers (front and rear)
(b) Power Link 2000 front lower cover
(c) Power Link 2000 top cap
(d) Power Link 2000 front upper cover
Disconnect Power
To disconnect power, complete the following steps:
- Before any procedure, disconnect the power.
- Follow local code and site lockout/tagout procedure to de-energize the station.
- Wait for energy to dissipate (approximately five minutes).
- Keep power off until all covers and panels are reinstalled and the work is complete.
-
Disconnect power at the site electrical panel.
Follow standard practice and local code to de-energize the applicable circuit and lock out/tag out the disconnect before proceeding.
-
Use a multimeter to test that the unit is de-energized.
