Introduction
To install Home Flex, complete the following steps:
- If the charging station is not installed, commissioned, or serviced by a ChargePoint certified technician using a ChargePoint-approved method, it is excluded from all ChargePoint and other warranties and ChargePoint is not responsible.
- You must be a licensed electrician and complete training at https://www.chargepoint.com/partners/training-certification to become ChargePoint certified and to access ChargePoint's web-based installer tools or ChargePoint Installer app.
Verify Content
Check the box (J1772 Home Flex factory configuration order) to ensure you have the Quick Start Guide, Installation Guide, and the following parts:
 to ensure you have the Quick Start Guide, this Installation Guide, and these parts.")
-
Charging station (if applicable, with attached input power cable)
-
Faceplate (pre-installed on charging station)
-
Installation template
-
Charging cable connector (J1772) with cable clip
-
Wire cover (pre-installed on charging station)
-
10 mm (3/8 in) driver bit
-
4 mm (3/16 in) drill bit
-
Three 6 mm (1/4 in) x 51 mm (2 in) lag screws
-
Ratings label sheet
Check the box (NACS![]() North American Charging Standard Home Flex factory configuration order) to ensure you have the Quick Start Guide and the following parts:
North American Charging Standard Home Flex factory configuration order) to ensure you have the Quick Start Guide and the following parts:
 to ensure you have the Quick Reference Guide, and these parts.")
-
Charging station with NACS
 North American Charging Standard holster ball insert (if applicable, with attached input power cable)
 -
Faceplate (pre-installed on charging station)
-
Installation template
-
Charging cable connector (NACS
North American Charging Standard) with cable clip -
Wire cover (pre-installed on charging station)
-
10 mm (3/8 in) driver bit
-
4 mm (3/16 in) drill bit
-
Three 6 mm (1/4 in) x 51 mm (2 in) lag screws
-
Ratings Label Sheet
Required Tools and Materials
You will also need one NEMA![]() National Electrical Manufacturers Association 14-50 Industrial Grade Outlet or one NEMA
National Electrical Manufacturers Association 14-50 Industrial Grade Outlet or one NEMA![]() National Electrical Manufacturers Association 6-50 Industrial Grade Outlet and supplies to install a hardwired circuit.
National Electrical Manufacturers Association 6-50 Industrial Grade Outlet and supplies to install a hardwired circuit.
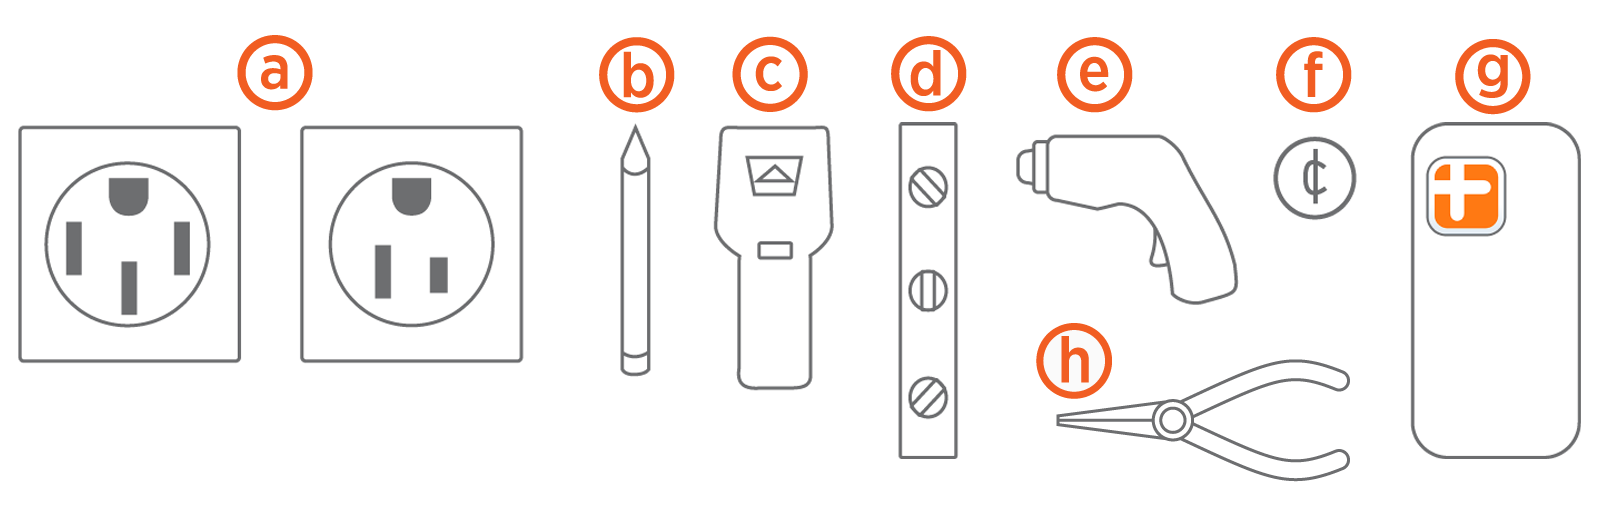
-
Electrical outlets - power sockets (optional)
-
Pencil
-
Stud finder
-
Level
-
Drill
-
Coin
-
Phone with app
-
Needle-nose pliers
-
#2 Phillips screwdriver
Plan the Location
Before beginning work, check the site for appropriate mounting location and electrical capacity.
-
Ensure the homeowner has chosen an installation location that allows the charging cable to reach the car's charging port while still providing slack. Mount the charging station on a surface that can support the full weight of the charging station with the cord hanging from it. Follow the steps below to mount on a surface using the supplied screws. Ensure Wi-Fi
Wireless Fidelity signal is available.Outdoor installation requires hardwiring or an outdoor-rated, weather-resistant electrical outlet. In areas with frequent thunderstorms, add surge protection at the service panel. Ensure all power and ground connections, especially those at the breaker and bus bar, are clean and tight. Remove all oxide from all conductors and terminals before connecting the wiring.
-
Home Flex must be set to match the rating of the circuit as determined by the available panel capacity.
Home Flex is a continuous load device. The circuit must be rated for 125% of the maximum load.Consult all applicable codes for breaker and wire sizing requirements. The field-wiring terminal is rated to 105 °C (221 °F) and accepts a maximum of 16 mm2 (6 AWG
American Wire Gauge) wire.A junction box may be required when using breakers rated higher than 50 A.Supports the following amperages for circuit capacity Circuit Rating
Max Load
Estimated Range per Hour
Plug-in
Hardwire
70 A
50 A
37 miles/60 km
no
yes
60 A
48 A
36 miles/58 km
no
yes
50 A
40 A
30 miles/48 km
yes
yes
40 A
32 A
25 miles/40 km
yes
yes
30 A
24 A
18 miles/29 km
no
yes
20 A
16 A
12 miles/19 km
no
yes
In Canada, a plug-in installation is only allowed with a 50 A circuit.
-
For plug-in installation, determine the plug type purchased by the homeowner. It is either an Industrial Grade Outlet (NEMA
National Electrical Manufacturers Association 14‑50) or Industrial Grade Outlet (NEMA National Electrical Manufacturers Association 6-50) type plug. -
For a hardwired installation, determine if the desired circuit rating requires a hardwired circuit.
-
Ensure the electrical panel supports a 240 V dedicated circuit with a new, dedicated, non-GFCI
Ground-Fault Circuit Interrupter two-pole circuit breaker, in accordance with local codes and ordinances.If local codes require a GFCI Ground-Fault Circuit Interrupter breaker for plug-in installation, ChargePoint recommends a hardwire installation. We do not recommend using a GFCI Ground-Fault Circuit Interrupter breaker as the Home Flex has charging circuit interrupting device (CCID Charge Circuit Interrupting Device) protection. A GFCI Ground-Fault Circuit Interrupter breaker in the panel causes nuisance tripping. from the ground adjacent to the stud where the charging station will be mounted.")
-
For plug-in installations, the outlet should be located 500-600 mm or 0.5 m - 0.6 m (20-26 in) from the ground adjacent to the stud where the charging station will be mounted.
The input power cable is 0.3 m (12 in) or 300 mm (12 in) long (as per the National Electric Code for EV Electric Vehicle chargers). Ensure the outlet is installed close enough to the stud for the input power cable to plug in.
-
Follow all applicable codes and ordinances and pull a permit for completing the electrical work as required.
