Install Cable Management Kit
The Power Link 1000 can be installed with standard cable management kit (CMK![]() Cable Management Kit), tall CMK
Cable Management Kit), tall CMK![]() Cable Management Kit, or overhead CMK
Cable Management Kit, or overhead CMK![]() Cable Management Kit for managing different length charging cables. Depending on the space or clearance available above the Power Link 1000, the standard and tall CMK
Cable Management Kit for managing different length charging cables. Depending on the space or clearance available above the Power Link 1000, the standard and tall CMK![]() Cable Management Kit may be installed at one of two height settings, a minimum or maximum height.
Cable Management Kit may be installed at one of two height settings, a minimum or maximum height.
|
Compatible Charging Cable Length |
Installation Height |
||
|---|---|---|---|
|
Minimum |
Maximum |
||
|
Standard |
Standard length (5.8 m or 19 ft) |
2.21 m (7 ft 3 in) |
2.41 m (7 ft 11 in) |
|
Tall |
Medium length (7.6 m or 25 ft) |
2.41 m (7 ft 11 in) |
3 m (10 ft) |
|
Overhead |
- |
- |
|
Install Standard CMK
If the site plan calls for the Power Link 1000 to be configured with a standard CMK![]() Cable Management Kit, follow procedures in this section to install the CMK
Cable Management Kit, follow procedures in this section to install the CMK![]() Cable Management Kit.
Cable Management Kit.
Inspect the Box for Contents
Check the standard CMK![]() Cable Management Kit package for the following components:
Cable Management Kit package for the following components:
For any missing component, contact ChargePoint support at chargepoint.com/support.

-
Front cover
-
Rear cover
-
Mast
-
Single or dual swingarm assembly
-
M6 Torx screws (x5)
Install Mast
To install the mast, perform the following steps:
-
Partially install screws into four upper holes on the rear exterior of Power Link 1000.

-
Hang the mast using the middle and lower keyholes.
Final install height of the CMK
 Cable Management Kit should be 2413 mm (7 ft 11 in).
The CMK
Cable Management Kit can be lowered 203 mm (8 in) by using the upper and middle keyholes to allow for installations with low overhead clearance.
-
Torque screws (x4) to 5.6 Nm (50 in-lb).

Install Swingarm Assembly
To install the swingarm, perform the following steps:
-
Insert two alignment pins into the bottom center of the swingarm attachment. Position the pins into the top of the mast.

-
Torque screws (x4 at rear and x1 at front) to 5.6 Nm (50 in-lb) .

Install Tall CMK
If the site plan calls for the Power Link 1000 to be configured with a tall CMK![]() Cable Management Kit, follow procedures in this section to install the CMK
Cable Management Kit, follow procedures in this section to install the CMK![]() Cable Management Kit.
Cable Management Kit.
Depending on the space or clearance available above the Power Link 1000, such as in a parking garage, you can install the CMK![]() Cable Management Kit at the following heights:
Cable Management Kit at the following heights:
-
Maximum: 3 m (10 ft)
-
Minimum: 2.41 m (7 ft 11 in)
Inspect the Box for Contents

-
Mast
-
Front and rear covers
-
Single or dual tall CMK
Cable Management Kit assembly -
M6 Torx screws (x8) and M10 hex screws (x4)
Install Mast
To install the mast, perform the following steps:
-
Partially install screws (x6) onto the back side of Power Link 1000.

-
Hang the mast onto the screws.
-
To install CMK
Cable Management Kit at maximum height, use keyholes located at bottom of mast.
-
To install CMK
Cable Management Kit at minimum height, use keyholes located higher up on the mast.
-
-
Torque screws (x6) to 5.6 Nm (50 in-lb) through the screw holes at the back of the mast.
 to through the screw holes at the back of the mast.")
Install Tall CMK Assembly
To install tall CMK![]() Cable Management Kit assembly, perform the following steps:
Cable Management Kit assembly, perform the following steps:
-
Find the M10 hex screws (x4) shipped in the tall CMK package.
-
Install the tall CMK
Cable Management Kit assembly onto the mast.
-
Install the M10 hex screws (x4) and torque to 13.5 Nm (120 in-lb).
 and torque to 13.5 Nm (120 in-lb).")
Install Overhead CMK
If the site plan calls for the Power Link 1000 to be configured with an overhead CMK![]() Cable Management Kit, follow procedures in this section to install the CMK
Cable Management Kit, follow procedures in this section to install the CMK![]() Cable Management Kit.
Cable Management Kit.
Inspect the Box for Contents
Check the overhead CMK![]() Cable Management Kit package for the following components:
Cable Management Kit package for the following components:
For any missing component, contact ChargePoint support at chargepoint.com/support.

-
Mounting bracket
-
Overhead CMK
Cable Management Kit -
Hardware kit with M8 hex nuts (x4) and M6 Torx screws (x4)
Install Overhead CMK Assembly
To install each overhead CMK![]() Cable Management Kit assembly, perform the following steps:
Cable Management Kit assembly, perform the following steps:
-
Find the M8 hex nuts (x4) and M6 Torx screws (x4) shipped in the overhead CMK package.
-
Install the bracket onto the pole.

-
Install and torque the M8 hex nuts (x4) to 12.2 Nm (108 in-lb) to secure the bracket.
 to 11 Nm (97 in-lb) to secure the bracket.")
-
Align the overhead CMK
Cable Management Kit onto the bracket and install M6 Torx screws (x4, x2 on the left side and x2 on the right side)..")
-
Torque the screws to 3.4 Nm (30 in-lb).
.")
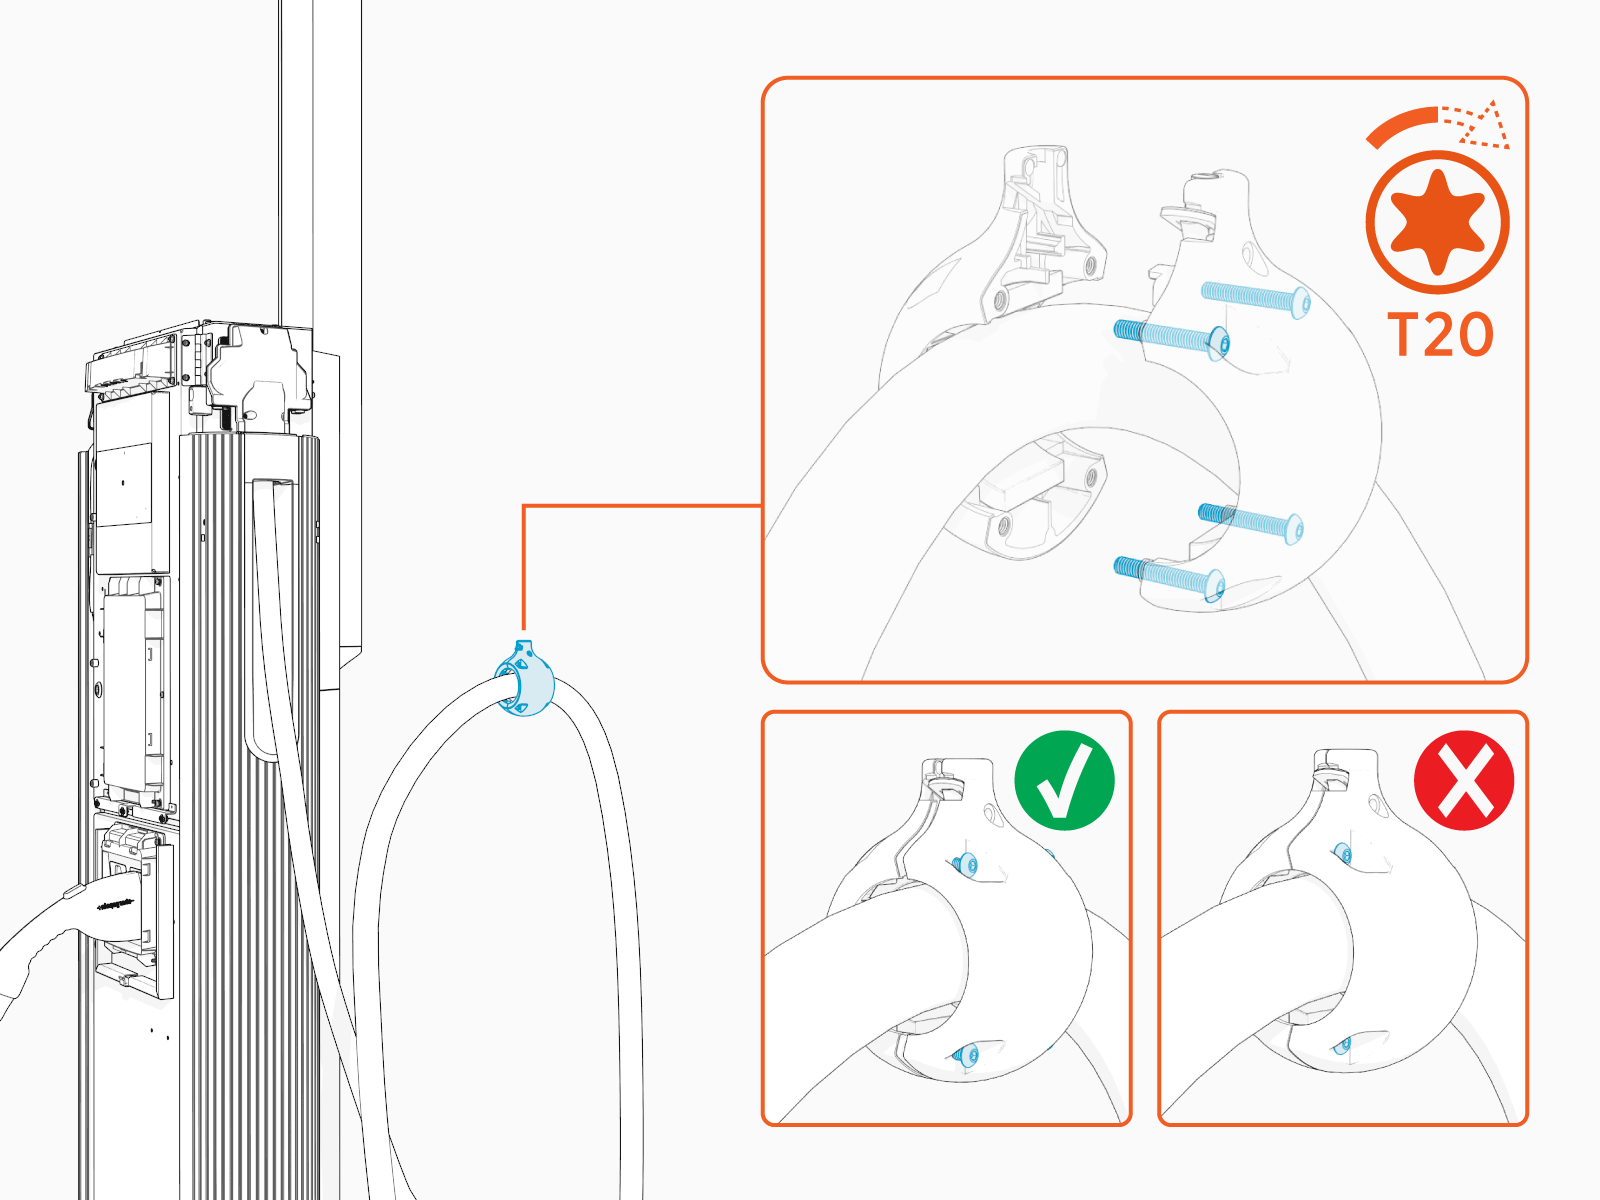
Install Tetherball
Standard length (5.8 m or 19 ft) charging cables come with a tetherball preinstalled onto the cable. For non‑LCC![]() Liquid Cooled Cable medium length (7.6 m or 25 ft) charging cables, a tetherball is not preinstalled onto the cable. It must be installed after installing the charging cable or while installing the CMK
Liquid Cooled Cable medium length (7.6 m or 25 ft) charging cables, a tetherball is not preinstalled onto the cable. It must be installed after installing the charging cable or while installing the CMK![]() Cable Management Kit.
Cable Management Kit.
To install tetherball, perform the following steps:
-
Loosely install the tetherball onto the cable.
-
If necessary, slide the tetherball to a position on the cable such that the lowest point of the cable remains 25 mm (1 in) off the ground when the cable is in its stored position.

-
Torque the screws (x4) to 2.8 Nm (25 in-lb).
 to 2.8 Nm (25 in-lb).")
Suspend Charging Cable
To suspend charging cable, perform the following steps:
-
Loosen the screw if it is not loose.

-
Align the spring tab in the tetherball with the flat notch on the tether pin. While aligned, gently push the tetherball onto the tether pin.

-
Torque the screw to 2.8 Nm (25 in-lb).
.")
-
Tug on the cable to check that it is securely attached and the swingarm or tool balancer is functioning. If you find limited motion or retraction, contact ChargePoint support at chargepoint.com/support.
-
Standard CMK
Cable Management Kit swingarm extension:
-
Tall CMK
Cable Management Kit tool balancer extension:
-
-
If two charging cables have been installed, repeat for the other side.
Install CMK Covers
To install CMK![]() Cable Management Kit covers, perform the following steps:
Cable Management Kit covers, perform the following steps:
-
Find the front and rear covers shipped in the CMK
Cable Management Kit package. -
Insert one edge of the rear cover into one of the grooves on the rear side of the CMK
Cable Management Kit mast.
-
Gently flex the rear cover to insert its other edge into the other groove on the rear side of the CMK
Cable Management Kit mast.
-
Repeat the above steps for the front cover and ensure the following:
-
If installing covers on the standard CMK
Cable Management Kit at maximum height, make sure that the front cover is resting on the two shoulder screws on the front side of the CMK Cable Management Kit mast. is installed at maximum height, make sure that the front cover is resting on the two shoulder screws no the mast's front.")
-
If the CMK
Cable Management Kit (either standard or tall) is installed at minimum height, cut its front cover to the following height:-
Standard CMK
Cable Management Kit's front cover:
-
Tall CMK
Cable Management Kit's front cover:
-
-
Install Tether Hook
Use tether hooks as additional support for overhead CMKs or to enable the use of third-party hoist or cable management solutions. The tether hook can be attached to either a fixed point or to an alternate cable management mechanism such as a winch.
To install the tether hook, perform the following steps:
-
Loosely install the tetherball onto the cable. Slide and position the tetherball onto the charging cable to an appropriate suspension position (prior to tightening the tetherball).
.")
-
Torque the screws (x4) to 2.8 Nm (25 in-lb).
-
Push the tether hook into the tetherball and tighten set screw.

-
Use steel cable (recommended 1/8” OD) and associated eyelet/thimble to connect to tether hook. Wrap the steel cable and eyelet around tether hook.
Images are not to scale. Measurements appear in metric units (mm) followed by imperial equivalents (inches). and associated eyelet/thimble to connect to tether hook. Wrap the steel cable and eyelet around tether hook.")
-
Secure the plastic housing around the tether hook. Torque the T20 screws (x2) to 1.3 Nm (10 in-lb). This ensures the steel cable is retained on the tether hook.
 to 1.3 Nm (10 in-lb). This ensures the steel cable is retained on the tether hook.")
-
Ensure the tether hook is securely fastened and the cable is properly supported.

