Introduction
This topic provides details to help industrial support engineers, field technicians, and ChargePoint's commissioning team identify and correct Express 250 bugs.
- If the charging station is not installed, commissioned, or serviced by a ChargePoint certified technician using a ChargePoint-approved method, it is excluded from all ChargePoint and other warranties and ChargePoint is not responsible.
- You must be a licensed electrician and complete training at https://www.chargepoint.com/partners/training-certification to become ChargePoint certified and to access ChargePoint's web-based installer tools or ChargePoint Installer app.
Before performing any procedure, the technician must disconnect the power to the charging station at the service panel. Follow local code to de-energize the applicable circuit and lockout/tagout the upstream breaker before proceeding. Use a multimeter and check that the power is off. Keep power off for the circuit until all cover panels are correctly reinstalled and the work is complete.
FAILURE TO FOLLOW THESE INSTRUCTIONS CAN RESULT IN SERIOUS INJURY, LOSS OF LIFE, OR PROPERTY DAMAGE.
Power On the System
The Express 250 charging station is powered on by the installation team at the site’s electrical panel, immediately after completing installation. The charging station does not have a separate power switch.
When power is turned on at the panel after it is first installed, the station runs a self-diagnostic that includes:
-
Electrical safety checks
-
Lighting checks
-
Display panel visual checks
-
Component operation checks (such as fans)
-
Installation Wizard process (allows installer to complete configuration and pinpointing of the station on user maps)
-
Network connectivity checks
When power is turned on at the panel after servicing or a power outage, the station runs a self- diagnostic to ensure safe and correct operation:
-
Electrical safety checks
-
Lighting checks
-
Display panel visual checks
-
Component operation checks (such as fans and contactors)
-
Network connectivity checks
If any errors are found, the station displays error codes on the website dashboard.
Power Off the System
The Express 250 does not need to be powered off except during service. The charging station does not have a separate power switch. The service technician turns off power at the electrical panel before beginning work. There is no need for a software command to power off the station; hardware is not harmed by disconnecting the circuit’s breaker.
Shunt trip wiring (wires that can be run to a separate disconnect switch) is available as a standard feature on the Express 250. Whether this feature is used, and where the switch is located, varies by site. For more information on how shunt trip wiring is designed and implemented, refer to the Express 250 Site Prep Guide and the Express 250 Installation Guide.
Configure System Behavior
ChargePoint offers its station owners a variety of software features to customize operation, such as:
-
How to set pricing and billing methods for station use
-
Who is allowed to use the station
-
Waiting lists if the station(s) are already full
-
How to display simple messages on the station
All configuration is done on the ChargePoint website for station owners. You are issued a username and password during the station purchase process. Log in at:
na.chargepoint.com or eu.chargepoint.com.
Materials and Parts Required
With regard to what materials to bring for doing repair and maintenance whether it is a standalone or a paired Express 250 charging station, see the materials mentioned under Required Tools and Materials section of the relevant Express 250's service guide.
Personal Protection Equipment (PPE)
Follow national, local or site specific PPE requirements. In the event of a conflict of PPE protocol, follow the strictest guidelines.
-
Working gloves (inserts not necessary)
-
Safety glasses
-
Safety shoes
-
Safety vest (if required)
-
Hard hat
In addition, ensure you have the following tools and materials:
-
Calibrated Digital Torque Wrench
-
All tools listed in the Express 250 Installation Guide
-
Inspection mirror
-
Lock out/tag out equipment
-
Permanent marker
-
ChargePoint approved service tent
-
Coolant
-
All tools listed in any Express 250 service guides for replacement parts or the tools listed under Required Tools and Materials section of the Express 250 Preventive Maintenance Guide as necessary.
Labels Located
As for the labels' location:
-
The CE label is located on the left side below the swing arm and above the light ring when facing the station.
-
The ratings label is located on the rear and that label is also located below the swing arm.
Stopping an Active Charging Session
When you need to stop charging your vehicle, follow the Correct Method (and not the Wrong Method) given below.
Wrong Method:
For all DC charging, when you need to stop charging your vehicle:
-
Do not use the CCS
 Combined Charging System handle button as a "stop" button during active charging.
 -
The adapter locks the CCS
Combined Charging System latch. -
So, never press this CCS
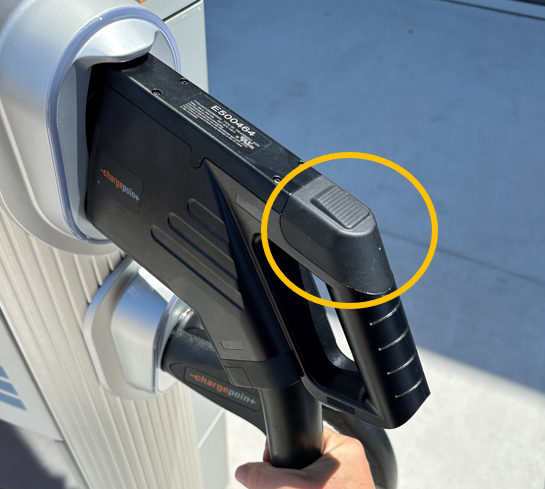
Combined Charging System handle latch button (that is shown highlighted within the yellow circle in the illustration below), unless the charging has stopped and the vehicle has unlocked the latch:
Reason:
-
Because doing so will lead to deformed and broken latches, which will in turn, lead to expensive handle and cable replacements.
-
Instead, follow the instructions given below under Correct Method.
Follow either of these two instructions:
-
Stop the charging session from the vehicle.
-
Use the Stop button on the Charging Station's Display.
-
For all DC charging: Only press the latch button after charging has been stopped by the vehicle or the station (screen, app).
-
For all AC charging: In most cases, most vehicles don't lock the port. So, using the latch to stop charging is normal, most of the time.
For All Tesla Vehicle Drivers:
-
In Tesla vehicles the adapter always remains locked to the CCS
Combined Charging System handle while inserted in the vehicle, even after charging has stopped. The charge port must be unlocked from the vehicle to remove the handle and adapter together. -
The handle button should never be used except to remove the adapter from the plug after removing the adapter and handle from the port.
