Replace Retractor Cord
Required Tools and Materials
|
|
Torx screwdriver (T25) |
|
|
Torx screwdriver (T20) |
|
|
CMK |
|
|
Philips head screwdriver |

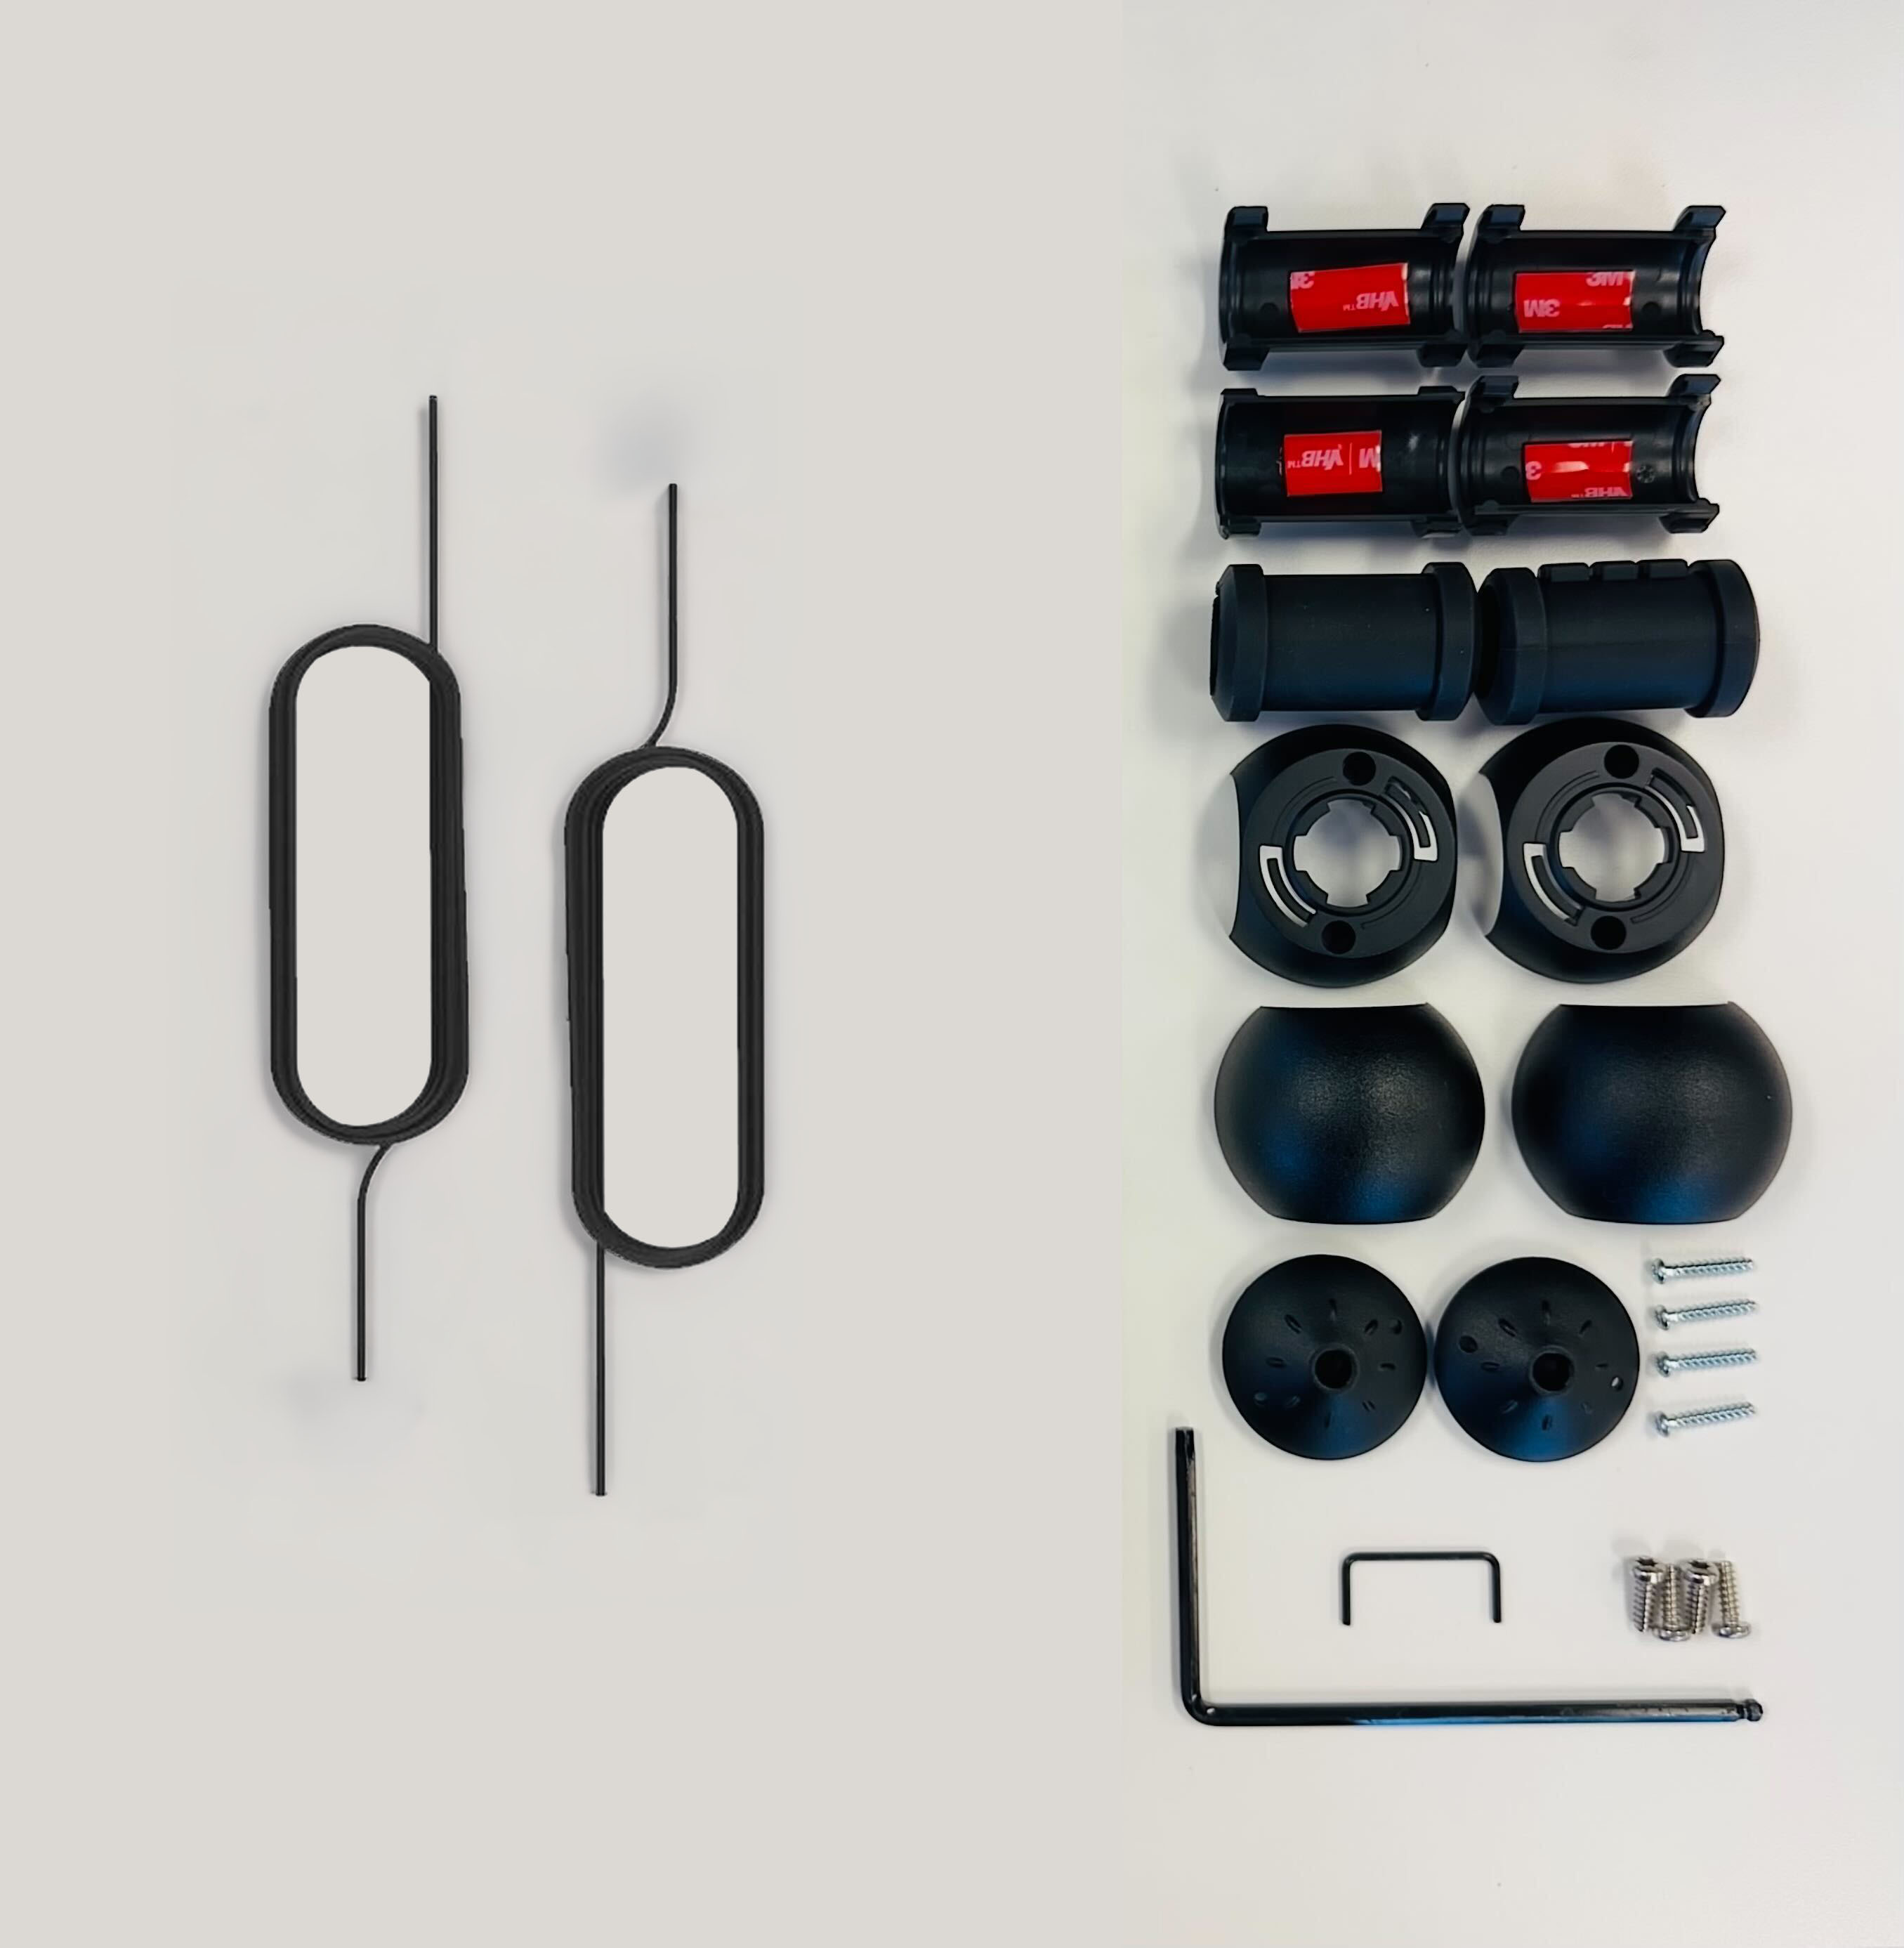
Listed below are the parts required to replace the retractor cord:
-
Rope replacement kit containing a rope with knot bearing
-
CMK
 Cable Management Kit service tool
 -
L-Wrench
-
Adhesive tape
-
Cable clamp top and bottom
-
Screws
-
Sleeves
Confirm that you have the correct box and that it contains the correct contents. There are two variants of this replacement kit.
Before you Start
Do not repair the charging station in inclement weather. If you must complete the installation in rain or wind, you must use a weather-proof shelter that covers all boxes and components.
When replacing a part, ChargePoint recommends taking a photo before removing each part so you can refer to the photo when reassembling.
For assistance, go to chargepoint.com/support and find your region’s technical support number.
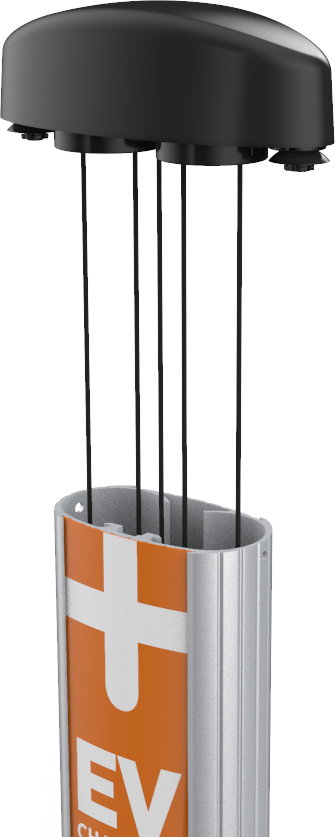
Replace the Retractor Cord
To replace the retractor cord, perform the following steps:
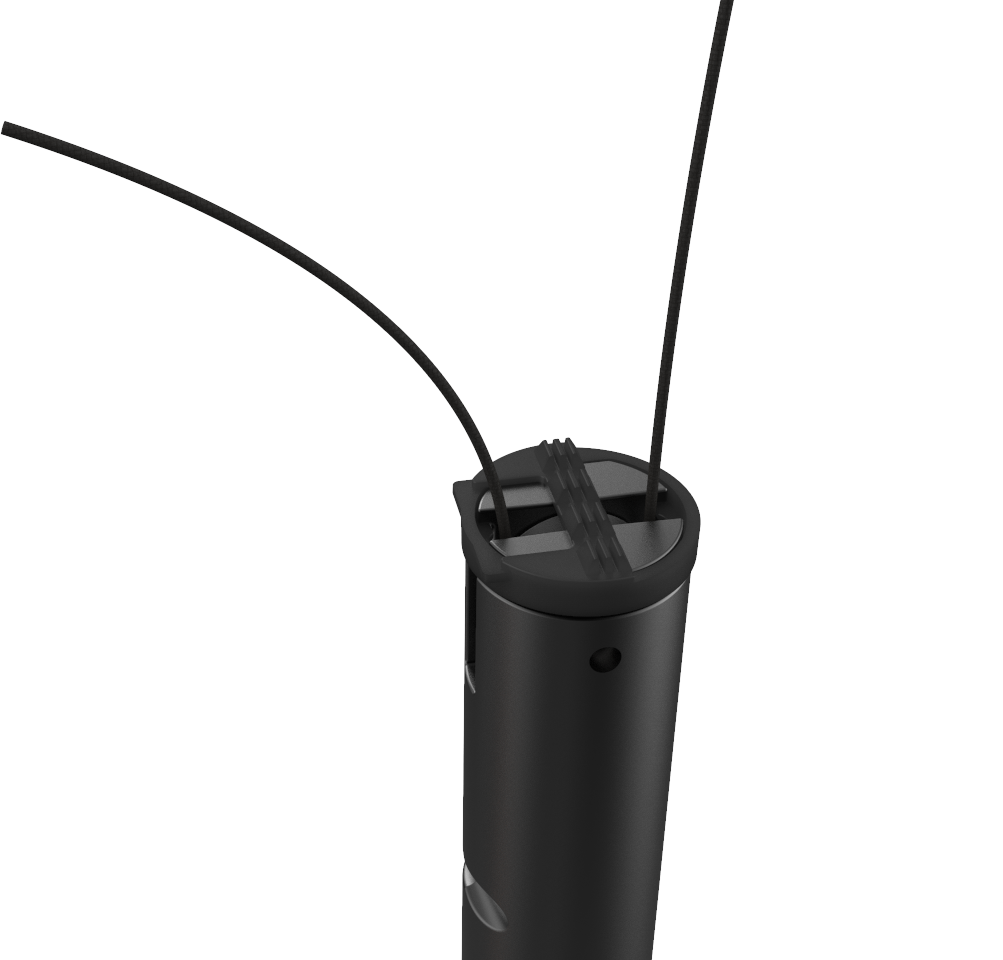
Remove the Cable Clamp
-
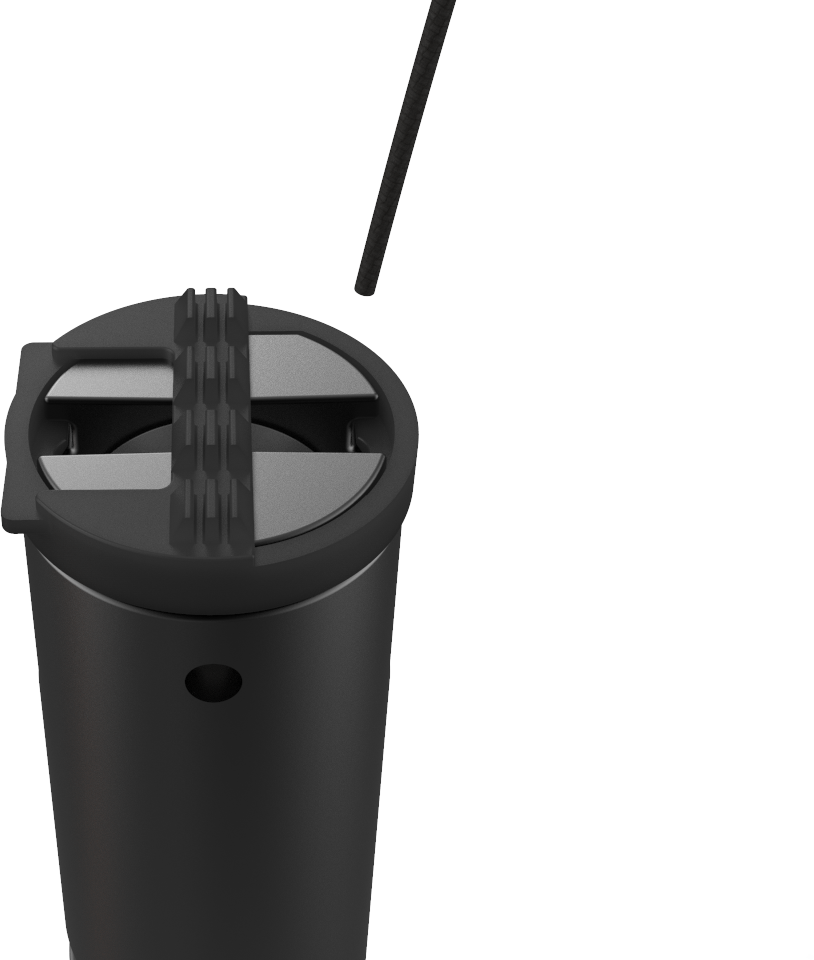
Insert the service tool teeth into the two holes in the knot bearing and turn the knot bearing counterclockwise approximately 1/4 turn.

-
Use the T25 screwdriver to remove the screws (x2) that hold the top to the bottom of the cable clamp.

-
Remove the top and bottom of the cable clamp, along with the adhesive tape.
-
Set the cable gently on a padded surface.
Remove the Retractor Cord
To remove the retractor cord, follow the steps below:
- Set up a ladder to reach the top of the CMK Cable Management Kit.
- For best results, put on gloves to make it easier to grip the rope.
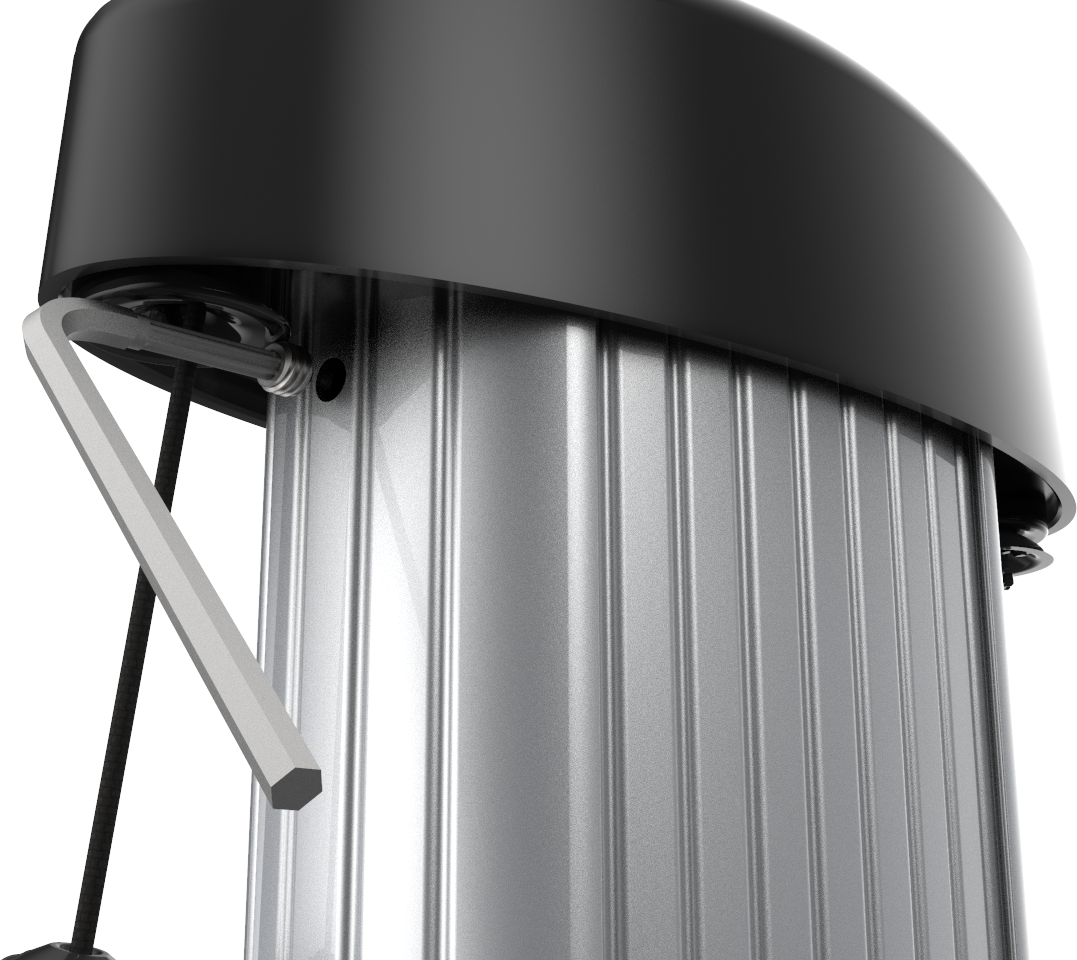
-
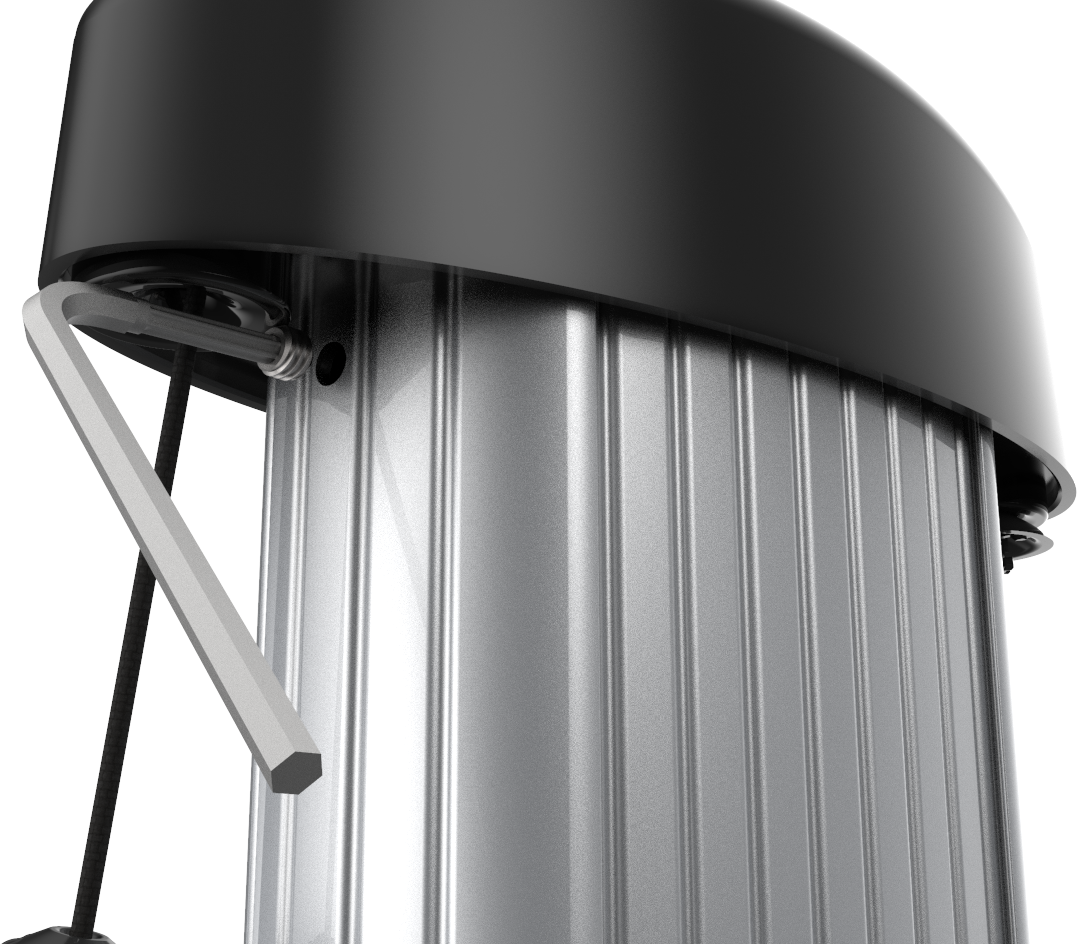
Using the T-25 L-wrench, loosen the set screws on each side of the CMK Cable Management Kit below the top cap
enough to let the counterweights pass by.
-
Lift the top cap up and back to rest on top of the CMK Cable Management Kit extrusion.

-
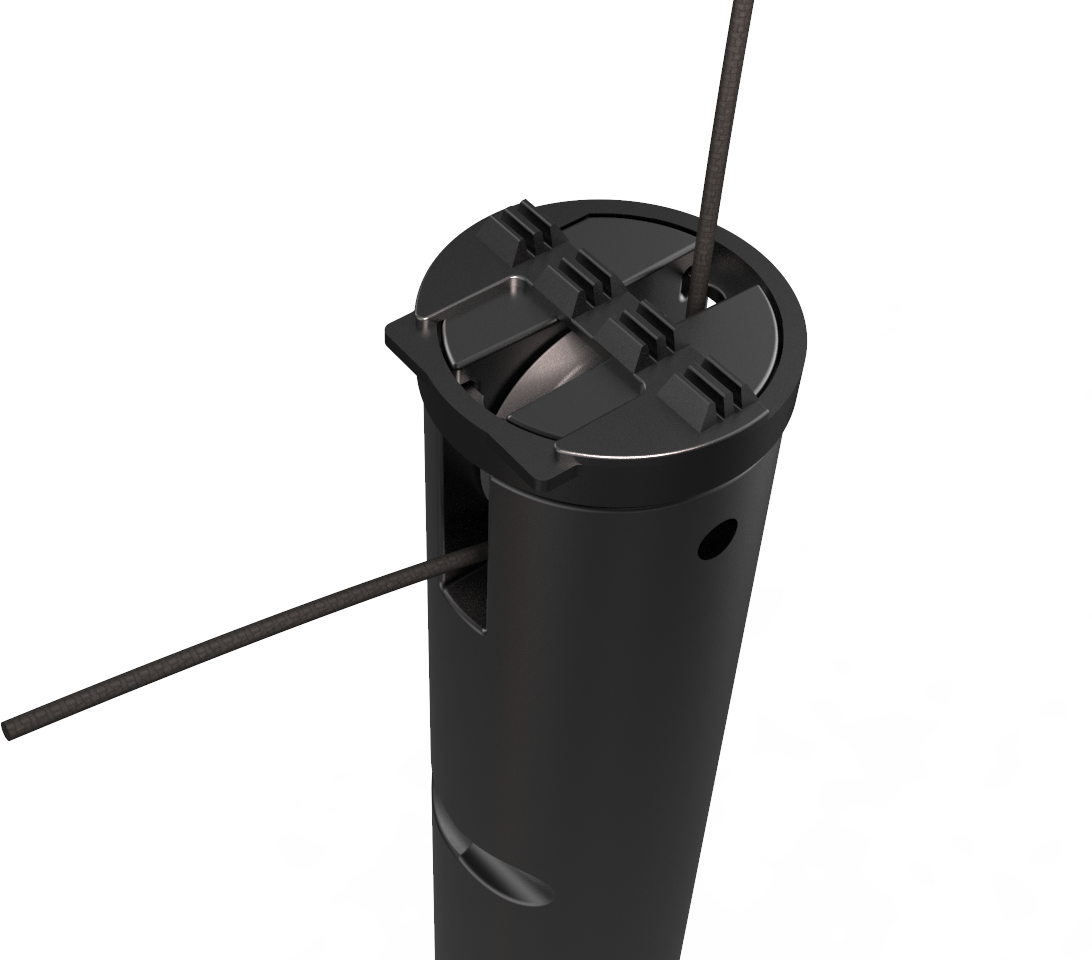
Place the CMK Cable Management Kit service tool over the exposed edge of the CMK Cable Management Kit extrusion.

-
Use both hands to pull the top assembly down and towards you until the center retrieval rope is exposed.
The center rope is a retrieval rope to raise the counterweights upwards inside the CMK Cable Management Kit extrusion.
- Insert the retrieval rope in the slot on the CMK Cable Management Kit service tool to hold the counterweights up in position.
- Pull the rope up again until the weights are nearly flush with the top of the housing.
- Reposition the center rope in the CMK Cable Management Kit service tool to hold the weights in position.
- Pull the center rope until the weights are in position.
- Hook the center rope in the service tool to hold the center rope in place.
-
Use a Phillips head screwdriver to unscrew the four screws holding the cover on the top cap assembly. Save the screws.

-
Remove the top cap cover.

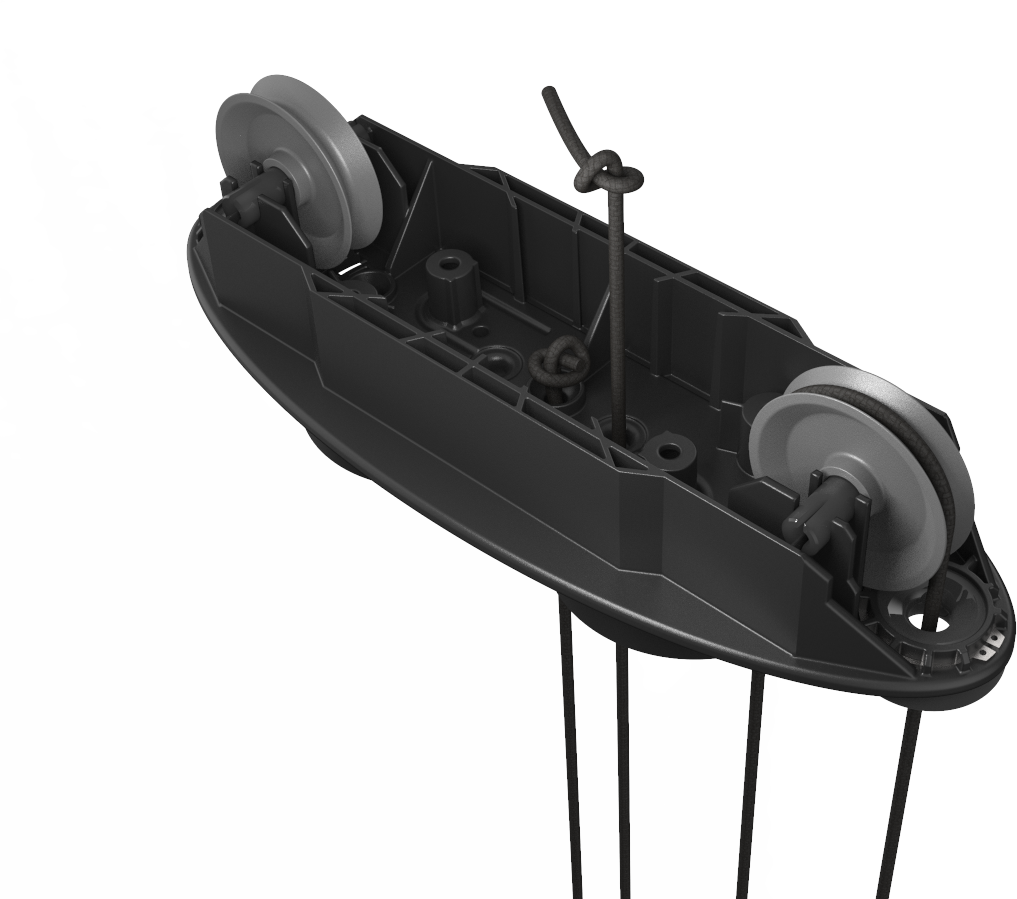
- Starting on one side, untie the knots used to hold the rope.
-
Gently lift the weight out of the housing.

-
Pull the retractor cord from the weight.
Install the Retractor Cord
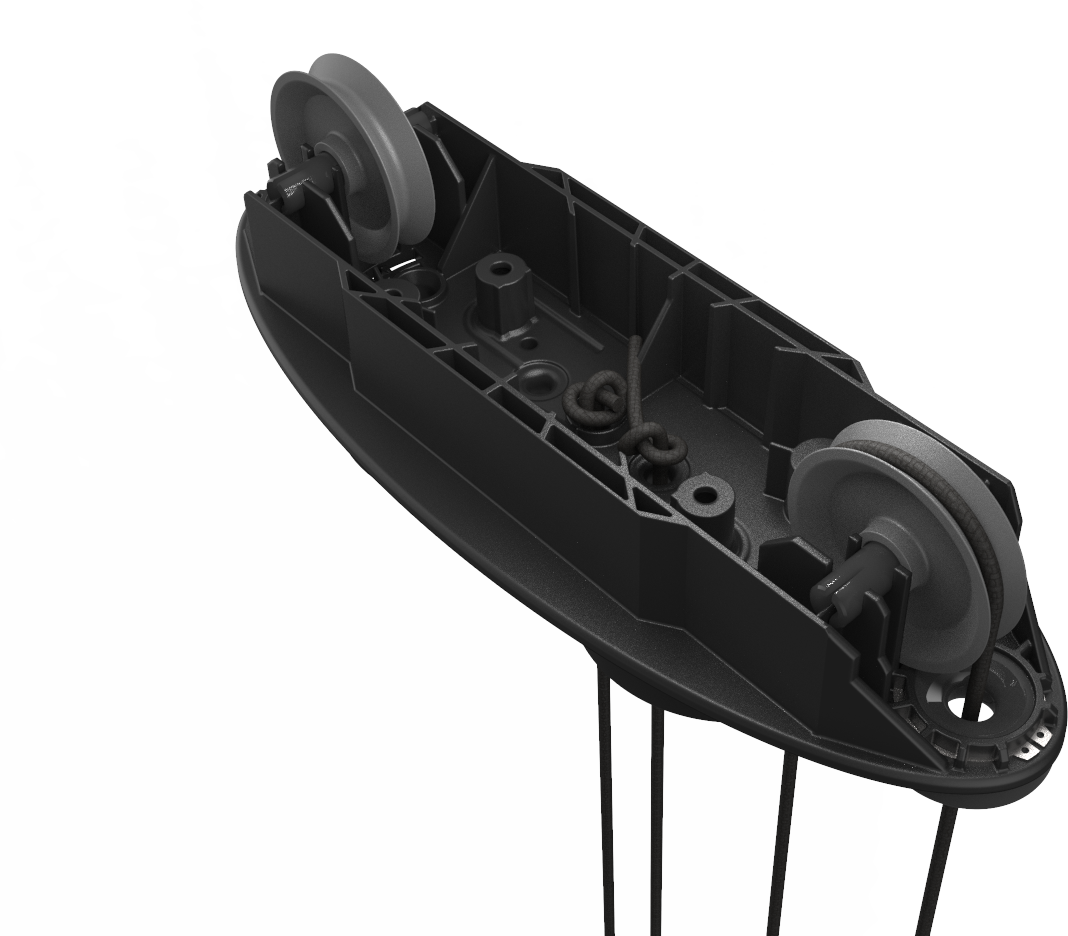
- Lace the new rope through the weight via the top and out the outside of the weight.
 The outside is the curved side. The inside is the flat side.
 -
Lace the rope under the pulley wheel through the center of the weight.
-
Lace the rope through the top of the weight from the outside to the center.
- Replace the weight in the housing.
-
Lace the end of the rope through the hole where the screw holding the clip was removed.

- Turn the top cap over and pull 100-150 mm (4-6 in) of rope through the hole.
-
Tie an overhand knot in the tail about 55-75 mm (2-3 in) from the end of the rope. Use the opposite hole as a guide for the needed length.
 Do not cut the tail of the rope. Allow the tail to remain in place. The tail must be at least 55 mm (2 in) long.
 - Pull the knot tight by hand.
-
Tuck the tails into the housing away from the pulleys.
- Ensure that the ropes remain threaded around the pulley wheels.
-
Replace the top cap using the four screws.
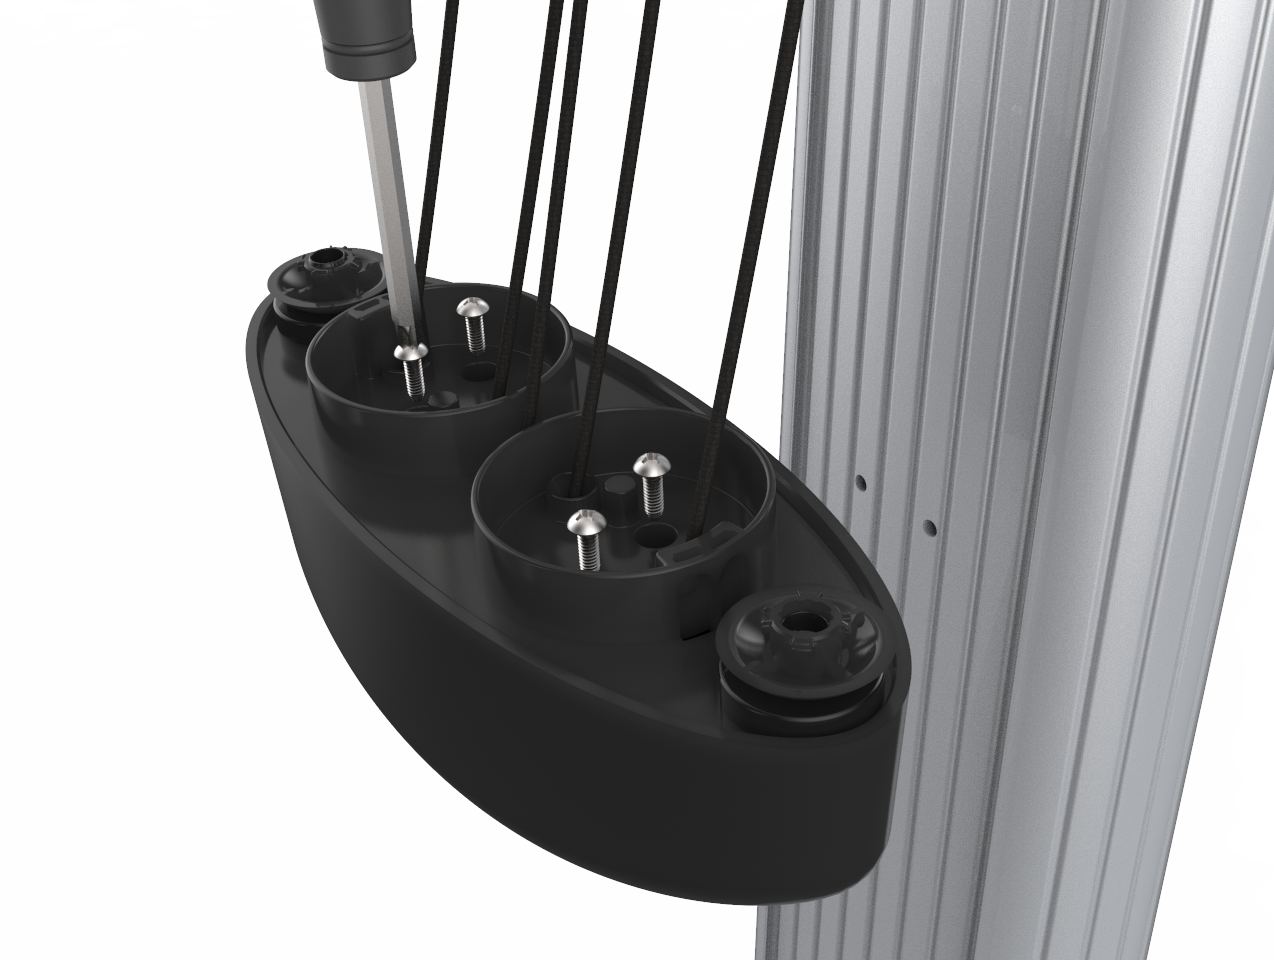
- Tighten the screws in a diagonal pattern.
-
Holding the top cap tightly, release the center rope from the CMK Cable Management Kit service tool.
- Remove the CMK Cable Management Kit service tool from the edge of the CMK Cable Management Kit.
- Lower the top cap gently, equalizing the tension on the ropes as you go.
-
Replace the set screws to lock the top cap into position.
- Discard the remaining Phillips screws, original rope, and plastic rope clips.
Install the Cable Clamp
-
Place the adhesive tape at the bottom portion of the new cable clamp.
-
Place the new bottom of the cable clamps on the cable underside of the cable in the same place as the old cable clamp.
-
Place the new top of the cable clamp on the topside of the cable to match the bottom of the cable clamp.
-
Verify that the top of the cable clamp (the flat portion) is correctly oriented to the top of the charging cable.
-
Use the T25 screwdriver to tighten the screws (x2) that hold the top to the bottom of the cable clamp.
-
Match the knot bearing on each rope to the corresponding mating feature on the cable clamps.
-
Insert the service tool into the two holes in the knot bearing clockwise approximately 1/4 turn. You may need to push it down while turning the knot bearing.
Ensure no gap exists between the top cap and the ball.
Verify Smooth Operation of the Rope
If a charging cable does not extend or retract fully and smoothly, it is likely that the rope has come off the pulley in the counterweight. You must reposition the rope onto the pulley.
To verify smooth operation of the pulley, follow the steps below:
-
Using the T25 L-wrench, loosen the set screws on each side of the top cap enough to let the counterweights pass by.
-
Lift the top cap up and back to rest on top of the CMK
Cable Management Kit extrusion. -
Place the CMK
Cable Management Kit service tool over the exposed edge of the CMK Cable Management Kit extrusion. -
Use both hands to pull the top assembly down and towards you until the center “retrieval” rope is exposed.
The center rope is a retrieval rope to raise the counterweights upwards inside the CMK Cable Management Kit extrusion. -
Insert the retrieval rope in the slot on the CMK
Cable Management Kit service tool to hold the counterweights up in position.Ensure the rope is firmly held by the CMK Cable Management Kit service tool before releasing your hands to pull up the next section of rope. -
Visually inspect the rope for correct alignment on the counterweight’s pulley. Make any necessary adjustments.
-
Check that the rope is moving smoothly through the top assembly’s cover. Make any necessary adjustments to ensure the rope is correctly aligned on its pulley.
-
Close and reinstall the top assembly.
-
Verify smooth operation of the rope once the CMK
Cable Management Kit is fully reassembled.
